If your Pi is connected to a display via HDMI you may see a small flash symbol in the corner of the screen sometimes indicating under-voltage. If you look into the log, you may see messages saying under-voltage detected.
You can also use a multimeter to measure the actual voltage on the 5V pin of the RPi header.
Official supplies from the RPi foundation have 5.1V.
Even with sufficient voltage, you still need to make sure, that both the RPi and your power supply can deliver sufficient current. If the Speaker draws more current than the supply can deliver or the RPi can safely pass from supply to Speaker, you may need a USB-Hub with separate power supply (as described in the article I linked above).
If you need more detailed help, please disclose your RPi model and the power requirements of the Speaker - there should be a label with current (symbol I, unit A or mA) or power (symbol P, unit W or mW) requirements on the side or back. I also need to know, if there are more USB peripherals connected
Thanks, unfortunately having prchased an official Pi power supply, I’m still having the same issue.
Funnily enough it is only the second rotary encoder that doesn’t work. The first encoder works fine. Swapping the encoder itself with a different one also makes no difference.
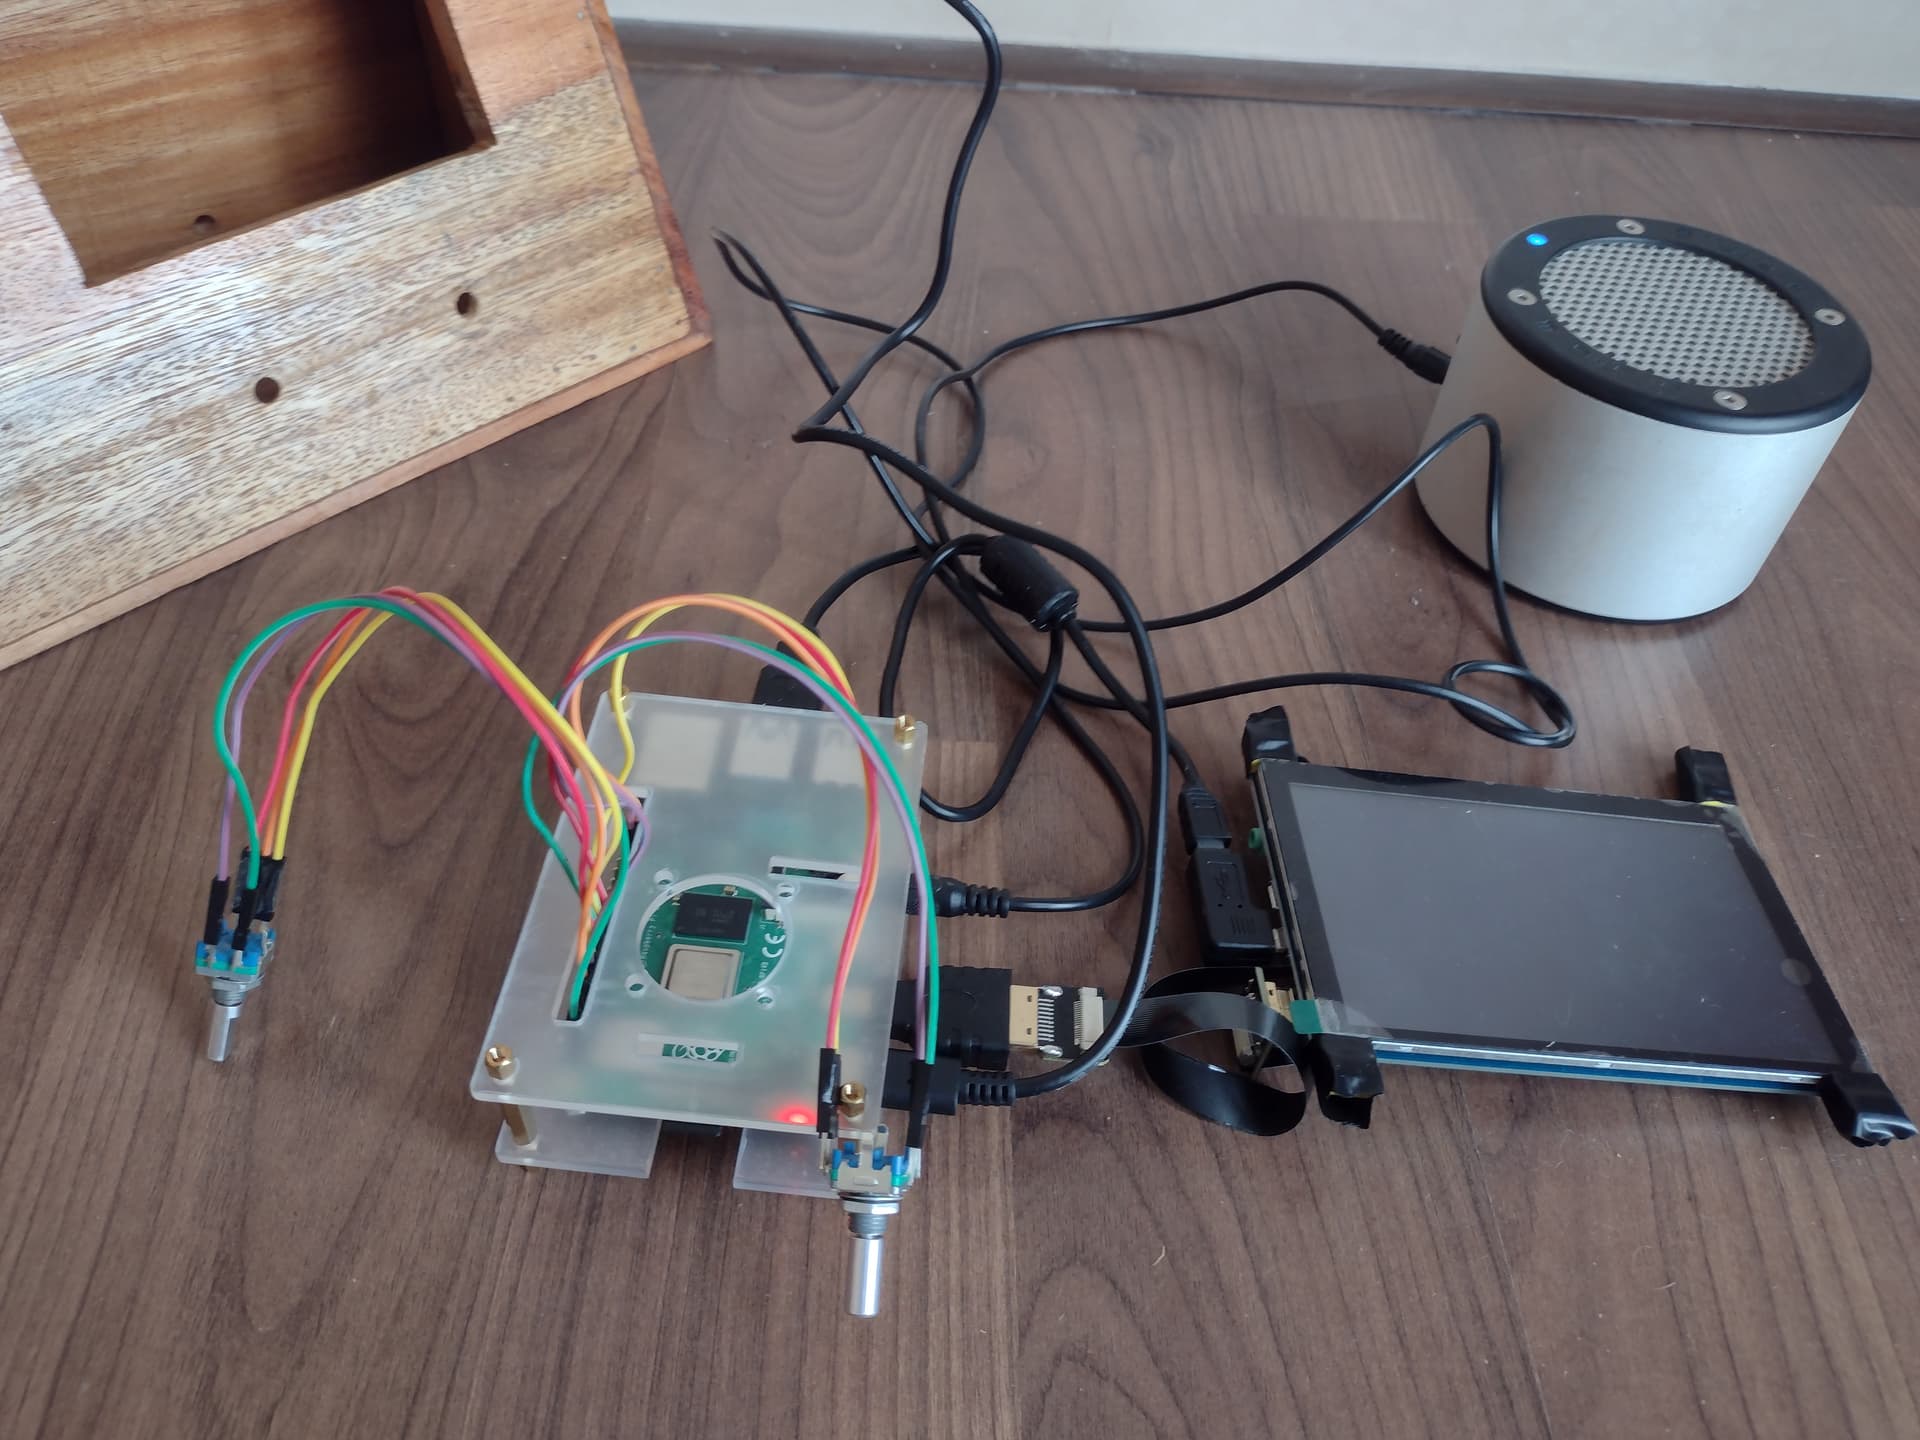
I’ve attached a pic of my set up.
Components:
Minirig speaker (running off an internal battery)
Raspberry Pi 4b
5 inch capacitive touch screen
Regarding the log, can I check this this via Putty SSH?
Many thanks for your assistance and please excuse any amateurish questons!
Can you draw a schematic for all your wiring. Its almost impossible to see where everything is wired to.
Also what are you doing to set the logic state of your gpio’s, I dont see any pull up/down resistors any where.
I also dont see any current limiting resistors inline between your rotary’s, switches and the gpio pins which could be potentially dangerous to your RPi
M1ck has already asked most of the questions I would also have.
Even if the RPi is making it look easy, you are still more or less directly playing with the GPIO pins of a microprocessor.
I have spent hours to write instructions about wiring. Did you take some time to read those?
You can find them here
If you follow the basic recommendations there, it should work.
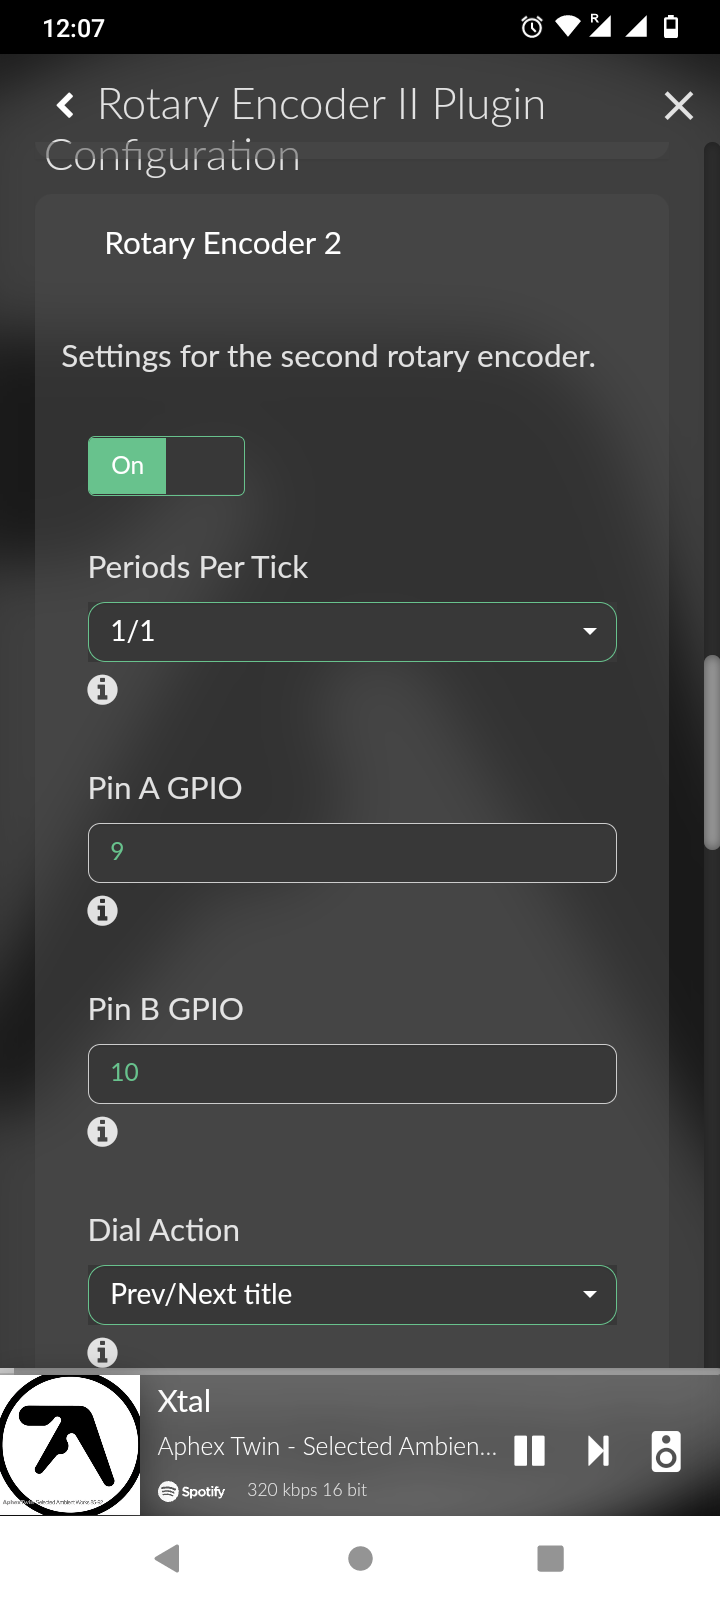
Hi, I want to use 2 rotary encoders for seek in title and second for volume but I want to have additional separate buttons. is it possible to use with this pluggin separate momentary button instead of using rotary encoder with integrated button?
This is my actual setup.
If I understand you correctly, you want to use 7 buttons and two rotaries.
That is not possible out of the box.
The plug-in supports up to 3 rotaries with button. You are free to use up to 3 rotaries without button (or without wiring the button) + up to 3 separate buttons.
You could additionally load another plug-in to support the other buttons, e.g. “GPIO Buttons” by @Darmur
You will need quite a lot of GPIOs though: 7+4. Watch out for the blocked ones.
Thanks T0MR0 for your answer. I realize that so :
Play/Stop , Next, Prev , Shutdown works with GPIO Buttons plug-in.
I just want to use 2 rotaries without button and to aditional 2 separate buttons for Mute and Repeat.
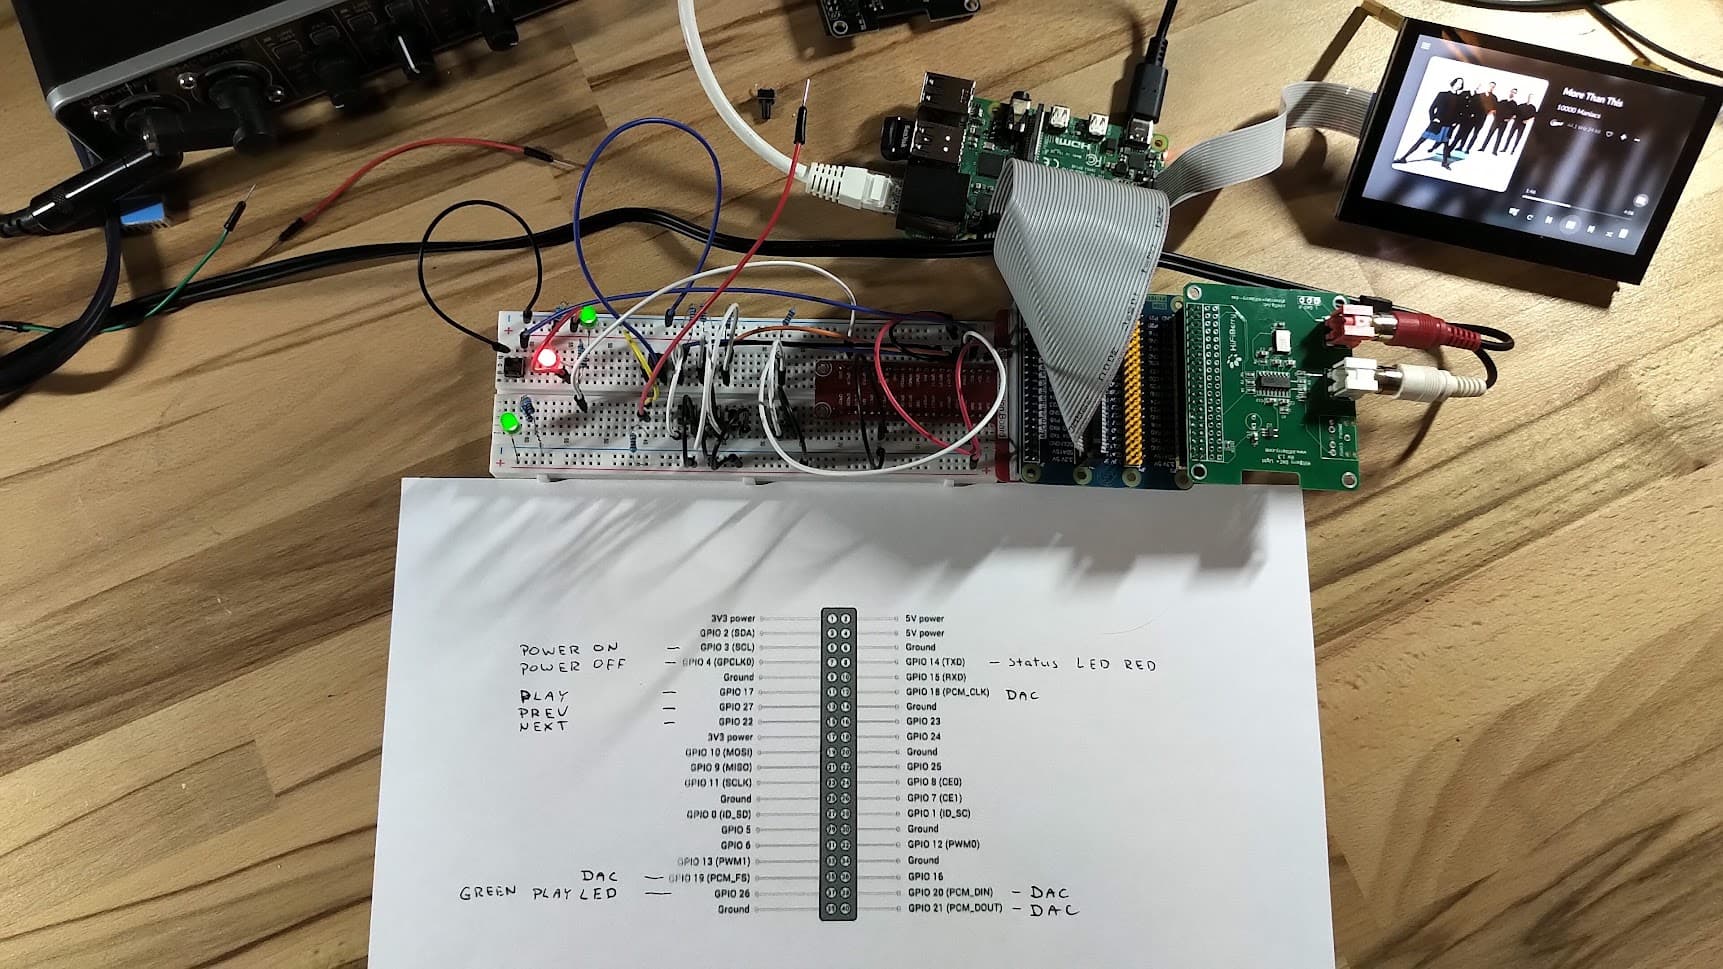
I read all those informations here, and I tried different connection possibilities with 5v, 3.3v, with and without resistors and i can’t get it to work. As you can see I have added picture with list of GPIO I have used now. there seems to be enough free GPIO ports.
Sorry, I think I do not understand, what your issue is.
Can you try to follow the instructions I gave in the first post?
It’s difficult and too time-consuming to try finding problems based on photos of flying-wire setups. A schematic drawing and a log-file would also be helpful.
I drafted the connection of a Rotary Encoder in this picture. If you disconnect at S1 and S2 and place a normal push-button between the open wires, it will work as well.
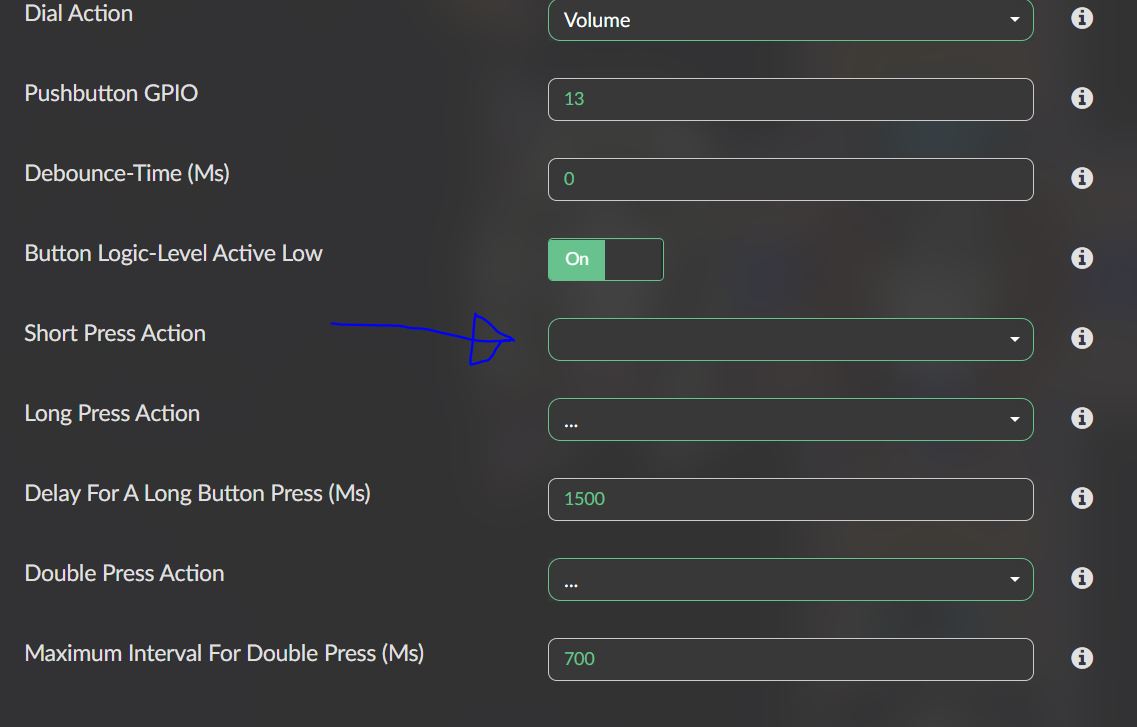
The push button actions… Would it be possible to add the option to turn on and off the Fusion DSP assuming its installed. Its currently burried under alot of clicks in the settings or in a drop down menu if you are using manifest layout.
A simple click of a button would be great. Is this a possibility or just not do-able.
Hi,
it’s probably already possible out of the box. If you read the instruction about how to configure Websock-Commands, you can probably get it running.
I am not familiar with Fusion DSP - had a quick look at the docs and sources but could not immediately figure out, what you mean by turning on and off. Do you mean you want to do what pressing the “Disable effects” button does?
In that case you can put the button function to Emit websocket message and then put
Command: callMethod
Data: {"endpoint":"audio_interface/fusiondsp","method":"enableeffect","data":[]}
Or do you mean you want to activate and deactivate the plugin?
If you want to enable and disable the plugin, it is possible to implement. There are undocumented Websock commands to enable and disable plugins. Unfortunately there is no toggle function, so it needs to be coded. Let me know, what you want exactly, I can push a test version if necessary the next weeks.
Yes, by turn on and off I do mean enable and disable effects.
The “Emit websocket message” option, looks like a possibillity, but will this work as a toggle. So that the effects are enabled and disabled with a click of a single button.
I will try this and see what happens in the next few days
You are right, did not pay attention. Toggle will not work, but if you let me know if it works in general,I can then integrate it as additional option.
Probably just a handful lines of code.
Once I had got Fusion DSP working properly ,turning the effects on and off from within the plugin OK.
I added Emit websocket message to button 1
Command: callMethod
Data: {"endpoint":"audio_interface/fusiondsp","method":"enableeffect","data":[]}
then added Emit websocket message to button 2
Command: callMethod
Data: {"endpoint":"audio_interface/fusiondsp","method":"disableeffect","data":[]}
Then could enable and disable the effects by clicking the relevent buttons. Seemed to work just as well as turning the effects on and off from within the app.
Thanks for checking. Did a quick implementation - did some basic tests but did not have enough time to install Fusion DSP and check.
Could you try to download v1.0.18 from the Beta-Channel and let me know if it works?
Hi @balbuze: is there a possibility to directly query the current state of the setting in your plugin? I did not have much time to implement @M1ck’s request and basically use a boolean variable to store the last state. If a user uses the rotary push-button and in parallel also uses the switch in the Fusion-Settings, I may be out of sync. Worst case, the user will have to press the button twice, if at the first press my stored state is !real state. Not a big thing, but I do not like to be sloppy
Just tried out the plugin, by uninstall and reinstall the beta.
I tested first by setting short press to play/pause to confirm it was working then set short press to enable/disable effects in fusion. Unfortunatly… it doesnt do anything when set like this.
When re-entering the settings the short press option has disapeared.
sorry, my fault - happens when you’re in a hurry. I forgot to change a string when I copied a section. I’m just fixing it - but currently install the Fusion DSP plugin to test it before submission. Will push it again soon
