I don’t know, but since the supplies are supposedly isolated from each other, the quality of the supply to the RPi shouldn’t matter so much.
I will try it if I can get hold of a suitable adapter.
This is Great!
I need one hahaha.
Regards Ioan.
This is my first post on volumio forum!
I’m happy to know by the Terra-Berry support page on facebook that a new thread about Terra-Berry DAC2 is opened.
I am a Japanese user who loves Tera-Berry DAC2 from this September.
In Japan there are several high-performance i2s DACs that are developed, manufactured and distributed on an individual basis. Among them, two representative ones are introduced, one is SabreBerry32 equipped with SABRE9018Q2C. Some resistors and capacitors need to be soldered by the user’s own hands. Additionally, users are required to install that driver by ssh login. The introduction hurdle is never low. Nevertheless, this i2s DAC has gained high support from many users. The other is a msBerryDAC equipped with PCM5122 and compatible with HiFiBerry DAC+ Pro. What is common to these two i2s DACs is that the power supply circuit is designed with extreme caution in order to fully exploit the capabilities of DAC ICs. Also, since both are driven in the master mode, they are designed to be sound qualityful. As a result, these have very high performance, but they are also inexpensive at the same time. I think that the situation unique to Japan that support is obtained in Japanese also seems to be the reason behind the fact that these i2s DACs are receiving user support. Actually, I am also a user of these two i2s DACs. (This post is also written using Google’s translation service.)
At the same time, however, due to the circumstances introduced above, these high-performance i2s DACs have the constraint of being limited to domestic distribution.
From such Japanese market, I am deeply grateful that Terra-Berry DAC2 has been sold to the whole world through volumio shop as one user in Japan.
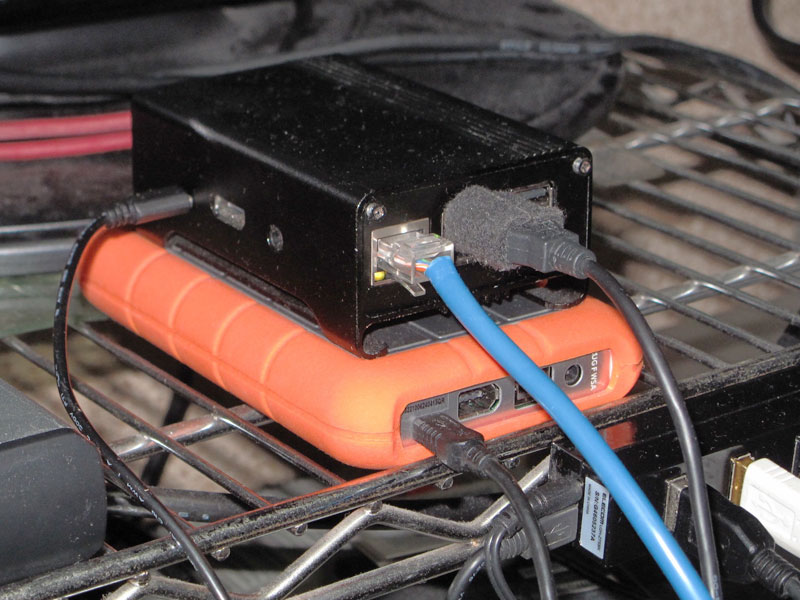
Before I mention my impression of Terra-Berry DAC2, let me introduce my environment of use.
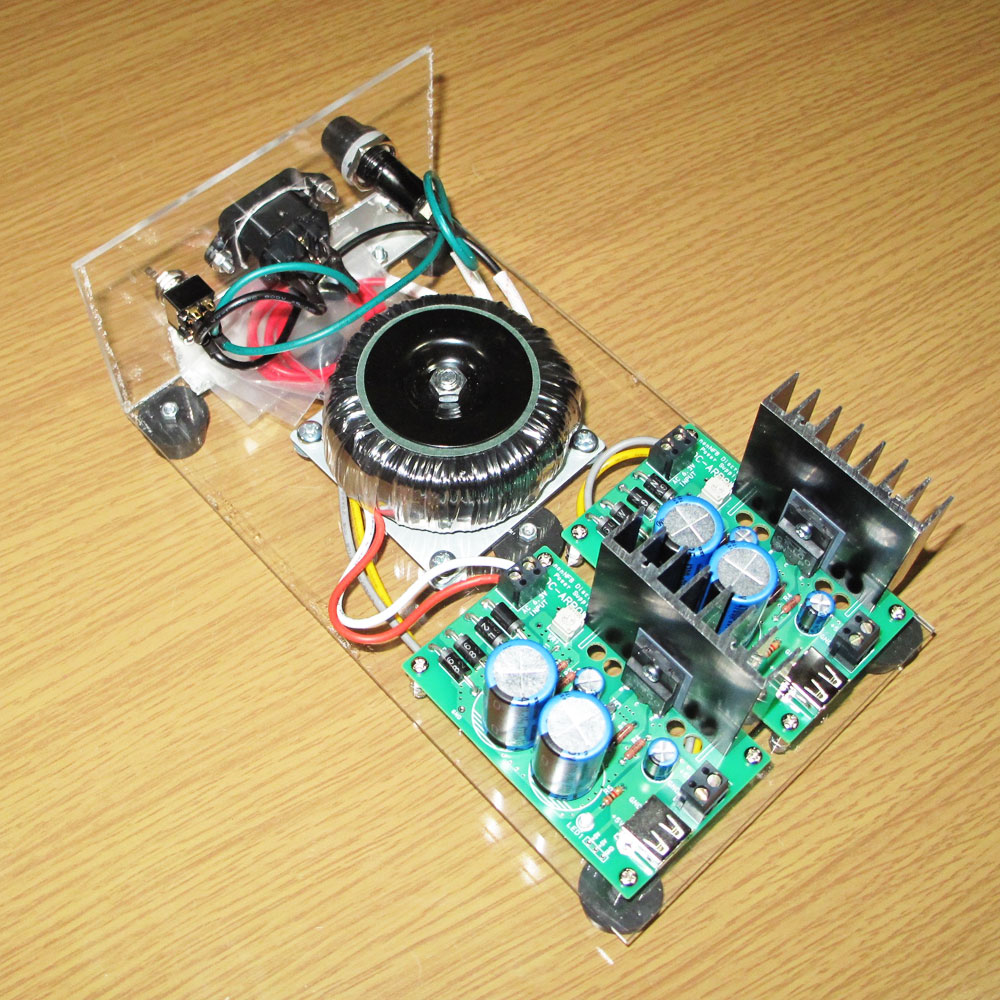
Two power supplies that supply 5V power are prepared for Raspberry Pi 3 and Terra-Berry DAC2 separately. It adopts a non-feedback series power supply designed exclusively for Raspberry Pi and has the ability to satisfy the strict power demand of Raspberry Pi 3. This power supply infrastructure is also developed and distributed by SabreBerry32 developer “Takazine”.
Compared with actually using two iFI-aduio iPower, I believe that the Takazine’s power supply named “DC-Arrow” is very superior in terms of sound quality.
The sound source is on a NAS assembled by myself with 2.5 inch USB HDD and Raspberry Pi 2, OpenMediaVault. These are powered by two iFI-audio iPower.
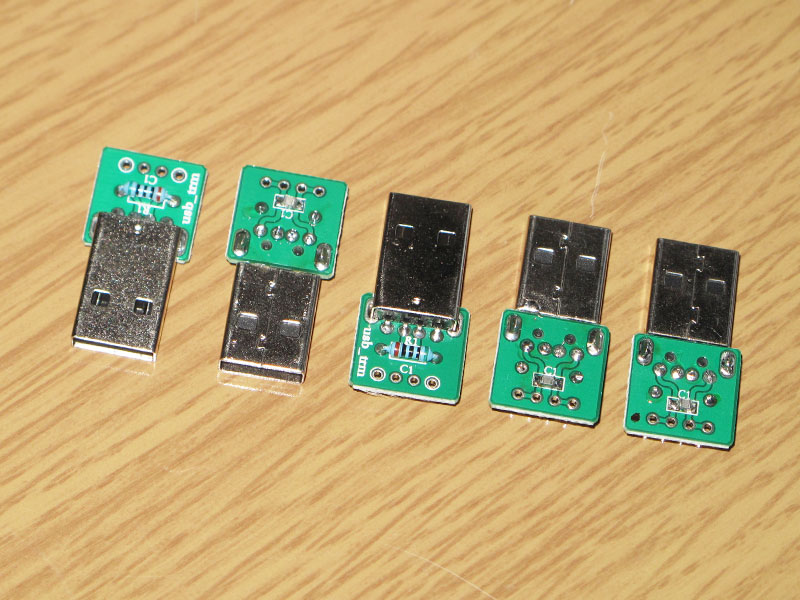
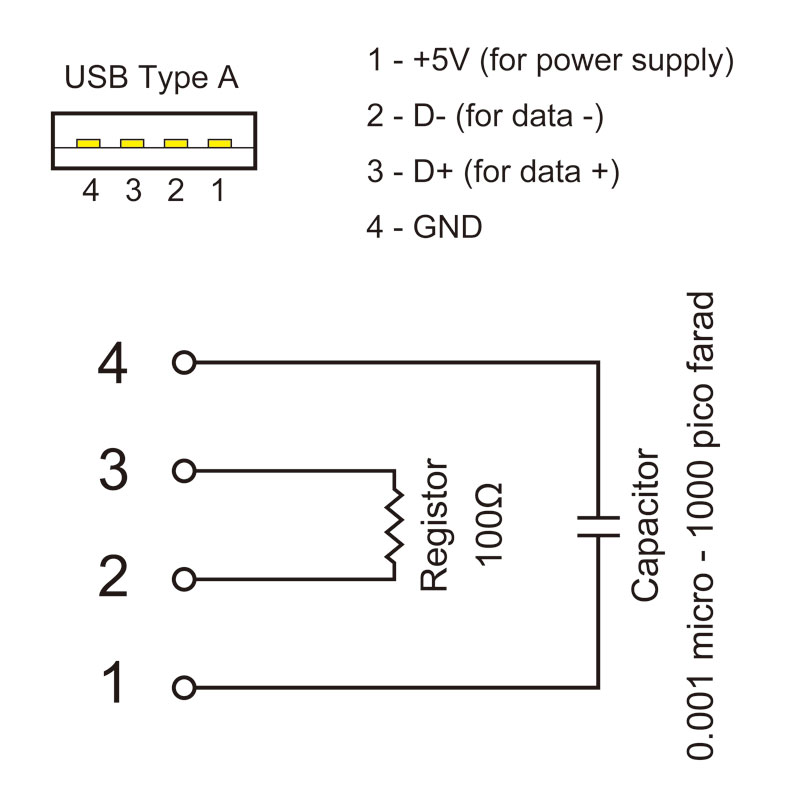
I do not use the USB port of Raspberry Pi 3, but keeping these empty will adversely affect the operation of Raspberry Pi. So I used 0.01 micro Farad capacitors and 100 Ω resistors to create USB terminators and terminated all USB ports. With this termination process, I was able to further improve the sound quality of Raspberry Pi. Although it is possible to invalidate the USB function like software, I do not know how to disable the USB function in volumio, so I coped with it by hardware. Either way, disabling this USB function is a very effective way to improve playback quality.
Terra-Berry DAC2 is driven in the slave mode. In addition, DAC IC AK4490 does not accept i2s. In order to realize high-quality music playback in spite of such restrictions, Terra-Berry DAC2 has AK4137 as the signal resampling converter and two kinds of crystal oscillators for the master clock. Furthermore, a microcomputer is installed so that these can be driven without special driver. In this way, while being driven by the slave mode, it is practically realizing music reproduction of the same quality as the master mode.
From the connector on the Terra-Berry DAC2 card it is possible to supply power separately to Raspberry Pi and Terra-Berry DAC2. At the same time, in addition to separately supplying power here, the ground of Raspberry Pi and Terra-Berry DAC2 is surely separated. With this design, the power environment on Raspberry Pi will not adversely affect Terra-Berry DAC2.
Single-ended signals are output through two op amps LME49720 on the top of the board. Balance signals are output through the two op amps LME49720 on the back of the board.
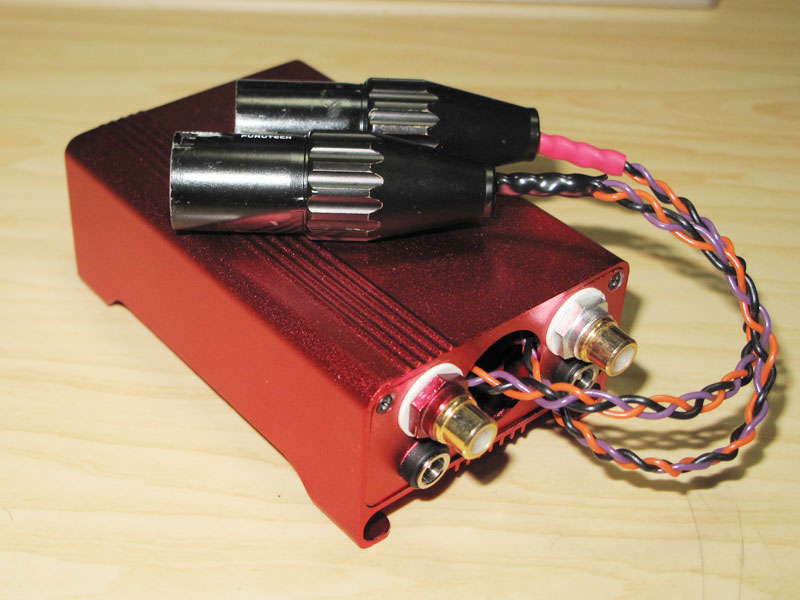
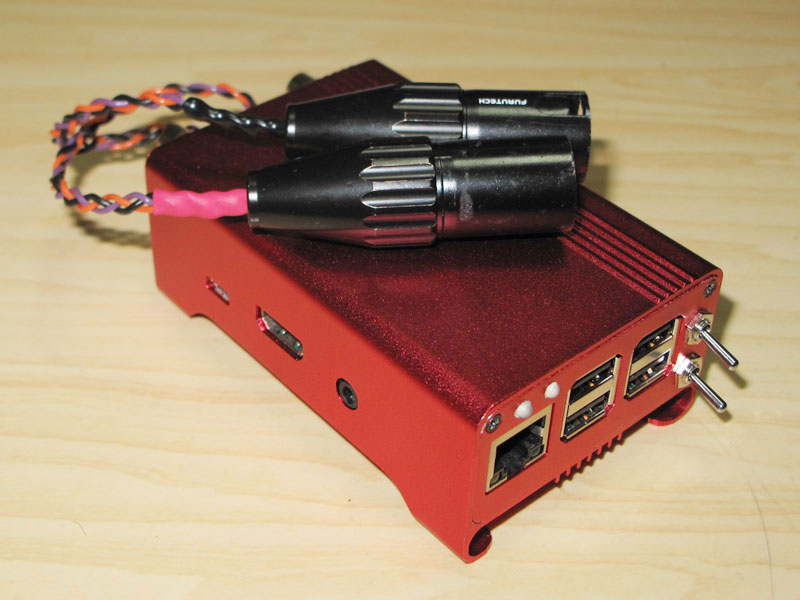
To take advantage of the above features of Terra-Berry DAC2, and to keep it in a compact case, I removed several connectors on the board. Since it is not possible to install balanced output terminals in a small case, draw out some signal lines and attach two XLR 3 pin connectors to the outside. Even if it looks bad, I want these XLR connectors, because I want to connect also to the Balanced Headphone Amp I like very much.
I installed a switch that switches between auto mode and manual mode and another switch that switches between PCM mode and DSD mode on the front panel with the USB port. At the same time, two LEDs are attached to display the mode status.
There are two RCA terminals and two DC input terminals on the rear panel. By doing this, I could concentrate all I / O on the front panel and the rear panel. I think that the layout of these input / output terminals is very important in actual use.
This is the overview of my usage environment.
The sound that comes out in this way is very precise and has a very high resolution. Even though there is an attack feeling in the low range, it is very smooth at the same time. The localization feeling is also very good. Asahi Kasei, which develops and manufactures AK4490, named this sound “Velvet Sound.” I certainly think that it is right.
Before purchasing the Terra-Berry DAC 2, I have loved i2s DAC cards that drive in the master mode. I thought that it would be difficult to get any more sound. But Terra-Berry DAC2 broke through my existing ideas.
The price of Terra-Berry DAC 2 is never easy to ask for, compared with other i2s DACs. However, considering how much cost it would take if I wanted to buy a DAC that would allow me to hear only the fine quality, the price of Terra-Berry DAC 2 seems very reasonable. This is not my opinion alone, it is also the opinion of a friend who is also a Terra-Berry DAC2 user.
Hi Mark, thanks for your interesting remarks and pictures. Do you find, as I do, that using PCM to DSD conversion mode is considerably better than straight PCM? Do you use linear or switching supplies?
Thank you very much and welcome @Mark_Jpn, this is a great contribution.
Removing the USB ports seems like a great idea. Could you explain step by step how you have done it?
You use hardware options by serial port. We’re a little bewildered with that.
Regards
Hi, jonners!
Thanks a lot for your quick approval to my post. 
Yes, I also think so as you do. I feel that its benefits are greater when playing compressed sound sources and using AirPlay. This mode switching can be performed without problem even when the T-B DAC is in operation.
I use linear supplies for both of Raspberry Pi and T-B DAC2. At first I was using iFI-audio iPower, but now I feel that the linear power supply is more advantageous for higher quality music playback.
1 Like
I somehow missed the post where Mark_Jpn describes his linear power supplies, hence my unnecessary question. I don’t see any mention of him accessing functions via the serial port though.
I wrote it wrong, it was a question, I’m sorry.
Mark, You use hardware options by serial port?. We’re a little bewildered with that.
1 Like
I’ve not used hardware control (ex. digital filter setting) by serial port. I’ve tried to control it via minicom, but have not succeeded yet.
1 Like
The concept of the USB terminator is as shown in the attached image.
Data ports are terminated by a 100Ω register located between pin 2 and 3. A capacitor is placed between the power supply line (pin 1) and the ground line (pin 4) to allow external noise caught by the power supply line to escape to the virtual ground. Changing the capacity and material of this capacitor seems to have some influence on the quality of playback sound. For miniaturization, I used a surface mounted metallized PPS film capacitor. I made 5 pieces, but it costs only 10 US dollars in total.
I tried to disable the USB function by ssh login, but it did not work on volumio.
Mark, welcome and thank you very much for all such informations. I think you’re detailing better than I could ever do all the characteristics of this DAC. I agree with you: this is not a DAC for everybody, but for those looking to carefully climb to reach the peak of what PI and I2S DACs have to offer.
As for serial communication, It’s not easy but its not impossible. If this DAC reaches enough success I might even do a plugin to control at least the volume. If\when I will have some free time I can do a quick tutorial on how to access the serial console of the DAC.
Hi
Thank you Mark.
Regards
I found a link to a method of turning off the Ethernet or USB ports: embeddedapocalypse.blogspot.co.u … sb-or.html
1 Like
Thanks, michelangelo!
In support of Tera Technos, I asked if the control via serial communication could be used by anyone.
They said…
It’s quite difficult because the configuration of the serial port is different depending on each distribution.The fastest way to do it is to login ssh and set it with a communication application such as minicom. In that case, in order to use the GPIO serial port, it is necessary to change the setting of the OS. I think that information on communication method between RaspberryPi and Arduino will be useful.
They ended up with the last “I am sorry that user friendly answers can not be made”.
I take this opportunity to study serial communication at Raspberry Pi.
I just tried to disable the USB function according to this information yesterday. But I could not do it. I installed hub-ctrl and installed gcc to compile hub-ctrl. But, it did not work.
If hub-ctrl runs correctly, “sudo hub-ctrl -v” show us the status of all ports including Ethernet as shown below.
~ $ sudo hub-ctrl -v
Hub #0 at 001:002
INFO: individual power switching.
WARN: Port indicators are NOT supported.
Hub Port Status:
Port 1: 0000.0503 highspeed power enable connect
Port 2: 0000.0000
Port 3: 0000.0000
Port 4: 0000.0000
Port 5: 0000.0000
Hub #1 at 001:001
INFO: ganged switching.
WARN: Port indicators are NOT supported.
Hub Port Status:
Port 1: 0000.0503 highspeed power enable connect
Please note that the status shown above is after all USB pots disabled.
Only USB ports will be disabled after rebooting by adding comment shown below to “/etc/rc.local”. Please note that it has not been verified in volumio yet.
sudo hub-ctrl -b 1 -d 2 -P 2 -p 0; /bin/sleep 2; sudo hub-ctrl -b 1 -d 2 -P 3 -p 0;sudo hub-ctrl -b 1 -d 2 -P 4 -p 0; sudo hub-ctrl -b 1 -d 2 -P 5 -p 0; sudo hub-ctrl -b 1 -d 2 -P 2 -p 0
“-b” of hub-ctrl means “Bus”. “-d” is “Device”, “-P” is “Port”, and ON/OFF is selected by a parameter of “-p”. “1” is “ON” and “2” is “OFF”. Port 1 is the Ethernet, from 2 to 5 are USB.
As you all know, Raspberry Pi has both Ethernet and USB controlled by a single IC. For that there is a strange habit and we have to add such a long comment.
I also used a distribution which scraped off music reproduction unnecessary functions as much as possible, it disables USB as a default. Its developer taught me about these informations.
ssh login is not recommended in volumio. In order to enable ssh login, it is also necessary to put the WebUI in debug mode via volumio.local/dev. It is a challenge to be done at the individual’s responsibility to the last, so I do not recommend it much.

Concluding thoughts: I’ve grown to like this DAC a lot over the last week. It does have a very natural and cohesive sound. (I’m referring here to the T-B2 in PCM to DSD mode with two separate power supplies, because in its ‘plug and play’ mode with a single supply it doesn’t really beat several much cheaper DACs in my opinion).
Going back to my Kali/Piano 2.1 combination, I’m hearing that the T_B is clearly better… But then it should be because it’s at least three times the price of Kali/Piano when taking account of the cost of shipping it from Japan plus VAT and Customs fees.
The T-B2 has good impact and articulation in the bass, and the instruments can be heard to relate to each other in a natural-sounding acoustic space (given a suitable recording of course). Treble is extended, clear, light and airy.
I tried an Aqvox linear 5V supply to the DAC and heard a further slight improvement in the way it handled the bass end of the spectrum.
I would certainly be happy for the Terra-Berry DAC2 to make its home in my system.
Today, I succeeded in changing the parameters of the hardware option through the serial port.
Terra Technos’ support has taught me important points. Raspberry Pi 3 Bluetooth uses UART exclusively. Therefore, in order to use the serial port, we have to change its setting.
According to their advice, I installed picocom as a terminal application. We were also able to use digital attenuator which has 256 steps by 0.5 dB including mute.
I am summarizing the steps necessary to use the serial port. I’d like to show you on this thread as soon as possible.