I’ve often thought that it would be good to have a thread where people can share the ‘not so obvious’ things that you can do with lircrc.
Looking at some of the Xbox One remotes like the below.
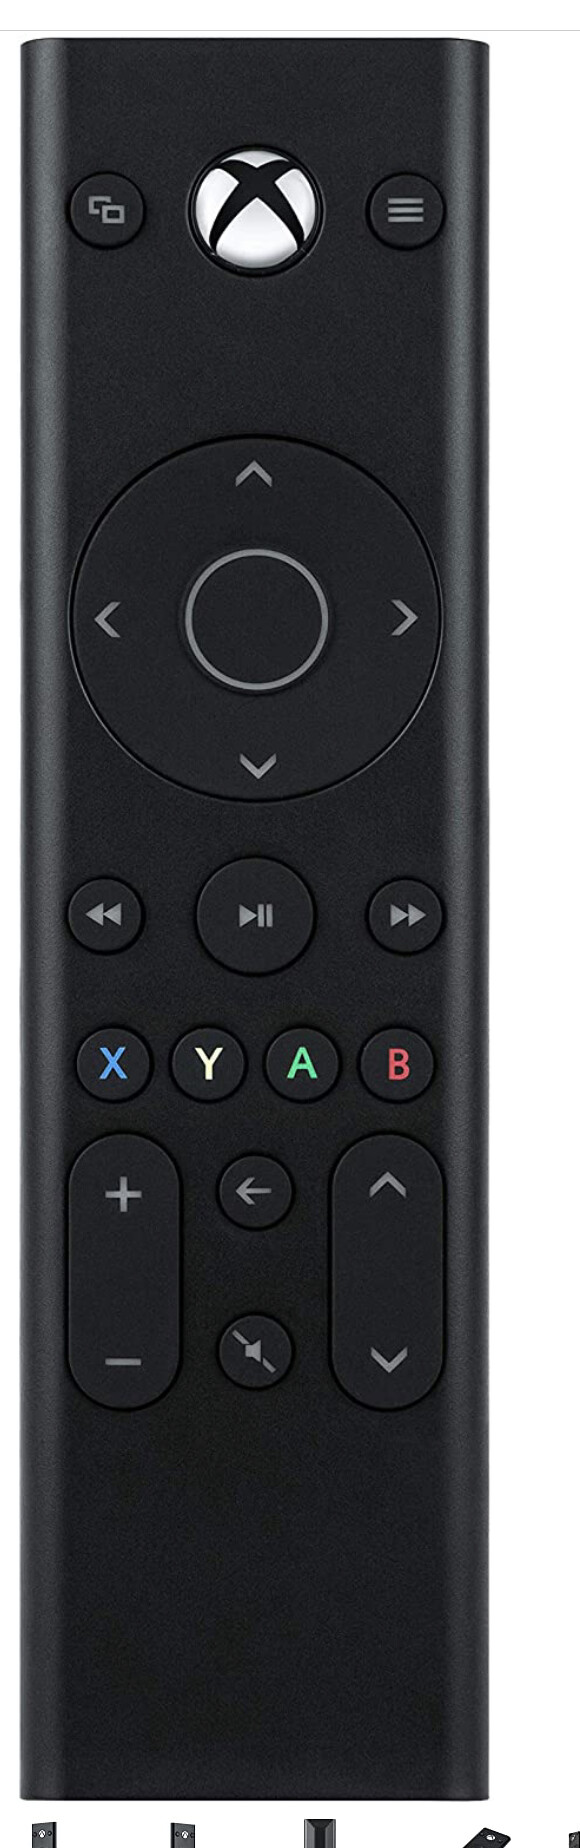
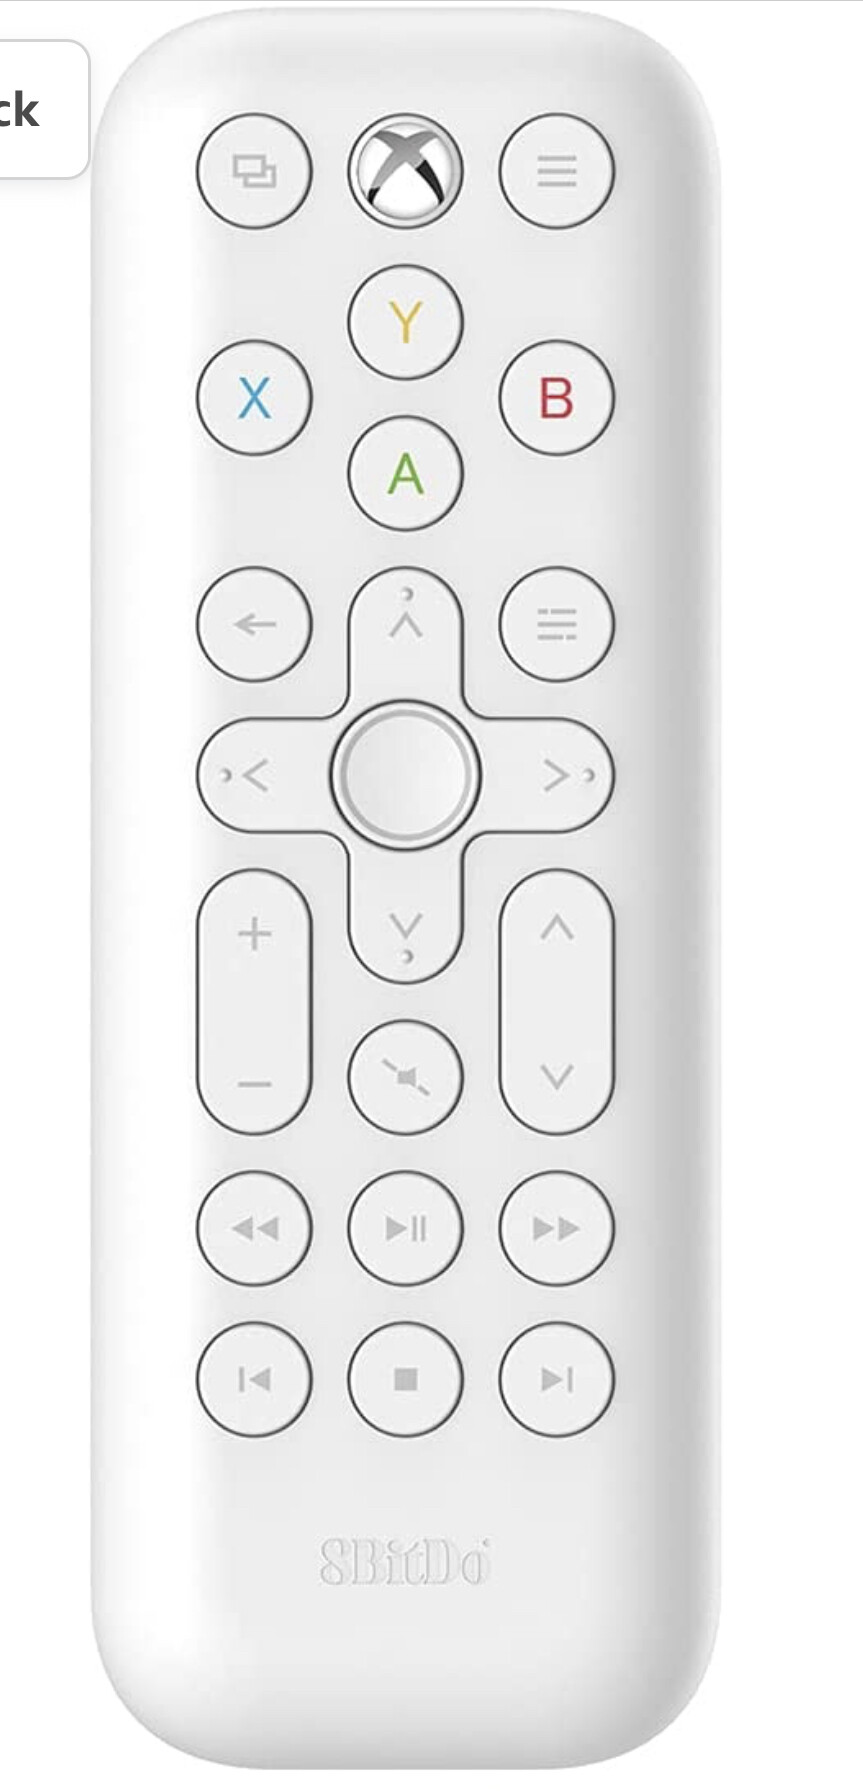
- They have more buttons than the Apple but not an obnoxious amount
- Have dedicated Nav buttons independent of Skip buttons
- Includes XYAB buttons which I could use later for other things
- About same price
- Look decent
The Pi is hooked to a preamp with its own remote and while I could go all in with a Harmony, that’s MUCH more work than I want (right now).
Also I am going to put one of these in my 1950 Motorola tube stereo console downstairs.
The tube preamp can accept line level, but will be stealth hiding a Volumio pi in it.
Remote for simple play/pause/next track would be nice, and I can hide the IR inside a hole in the grill material.
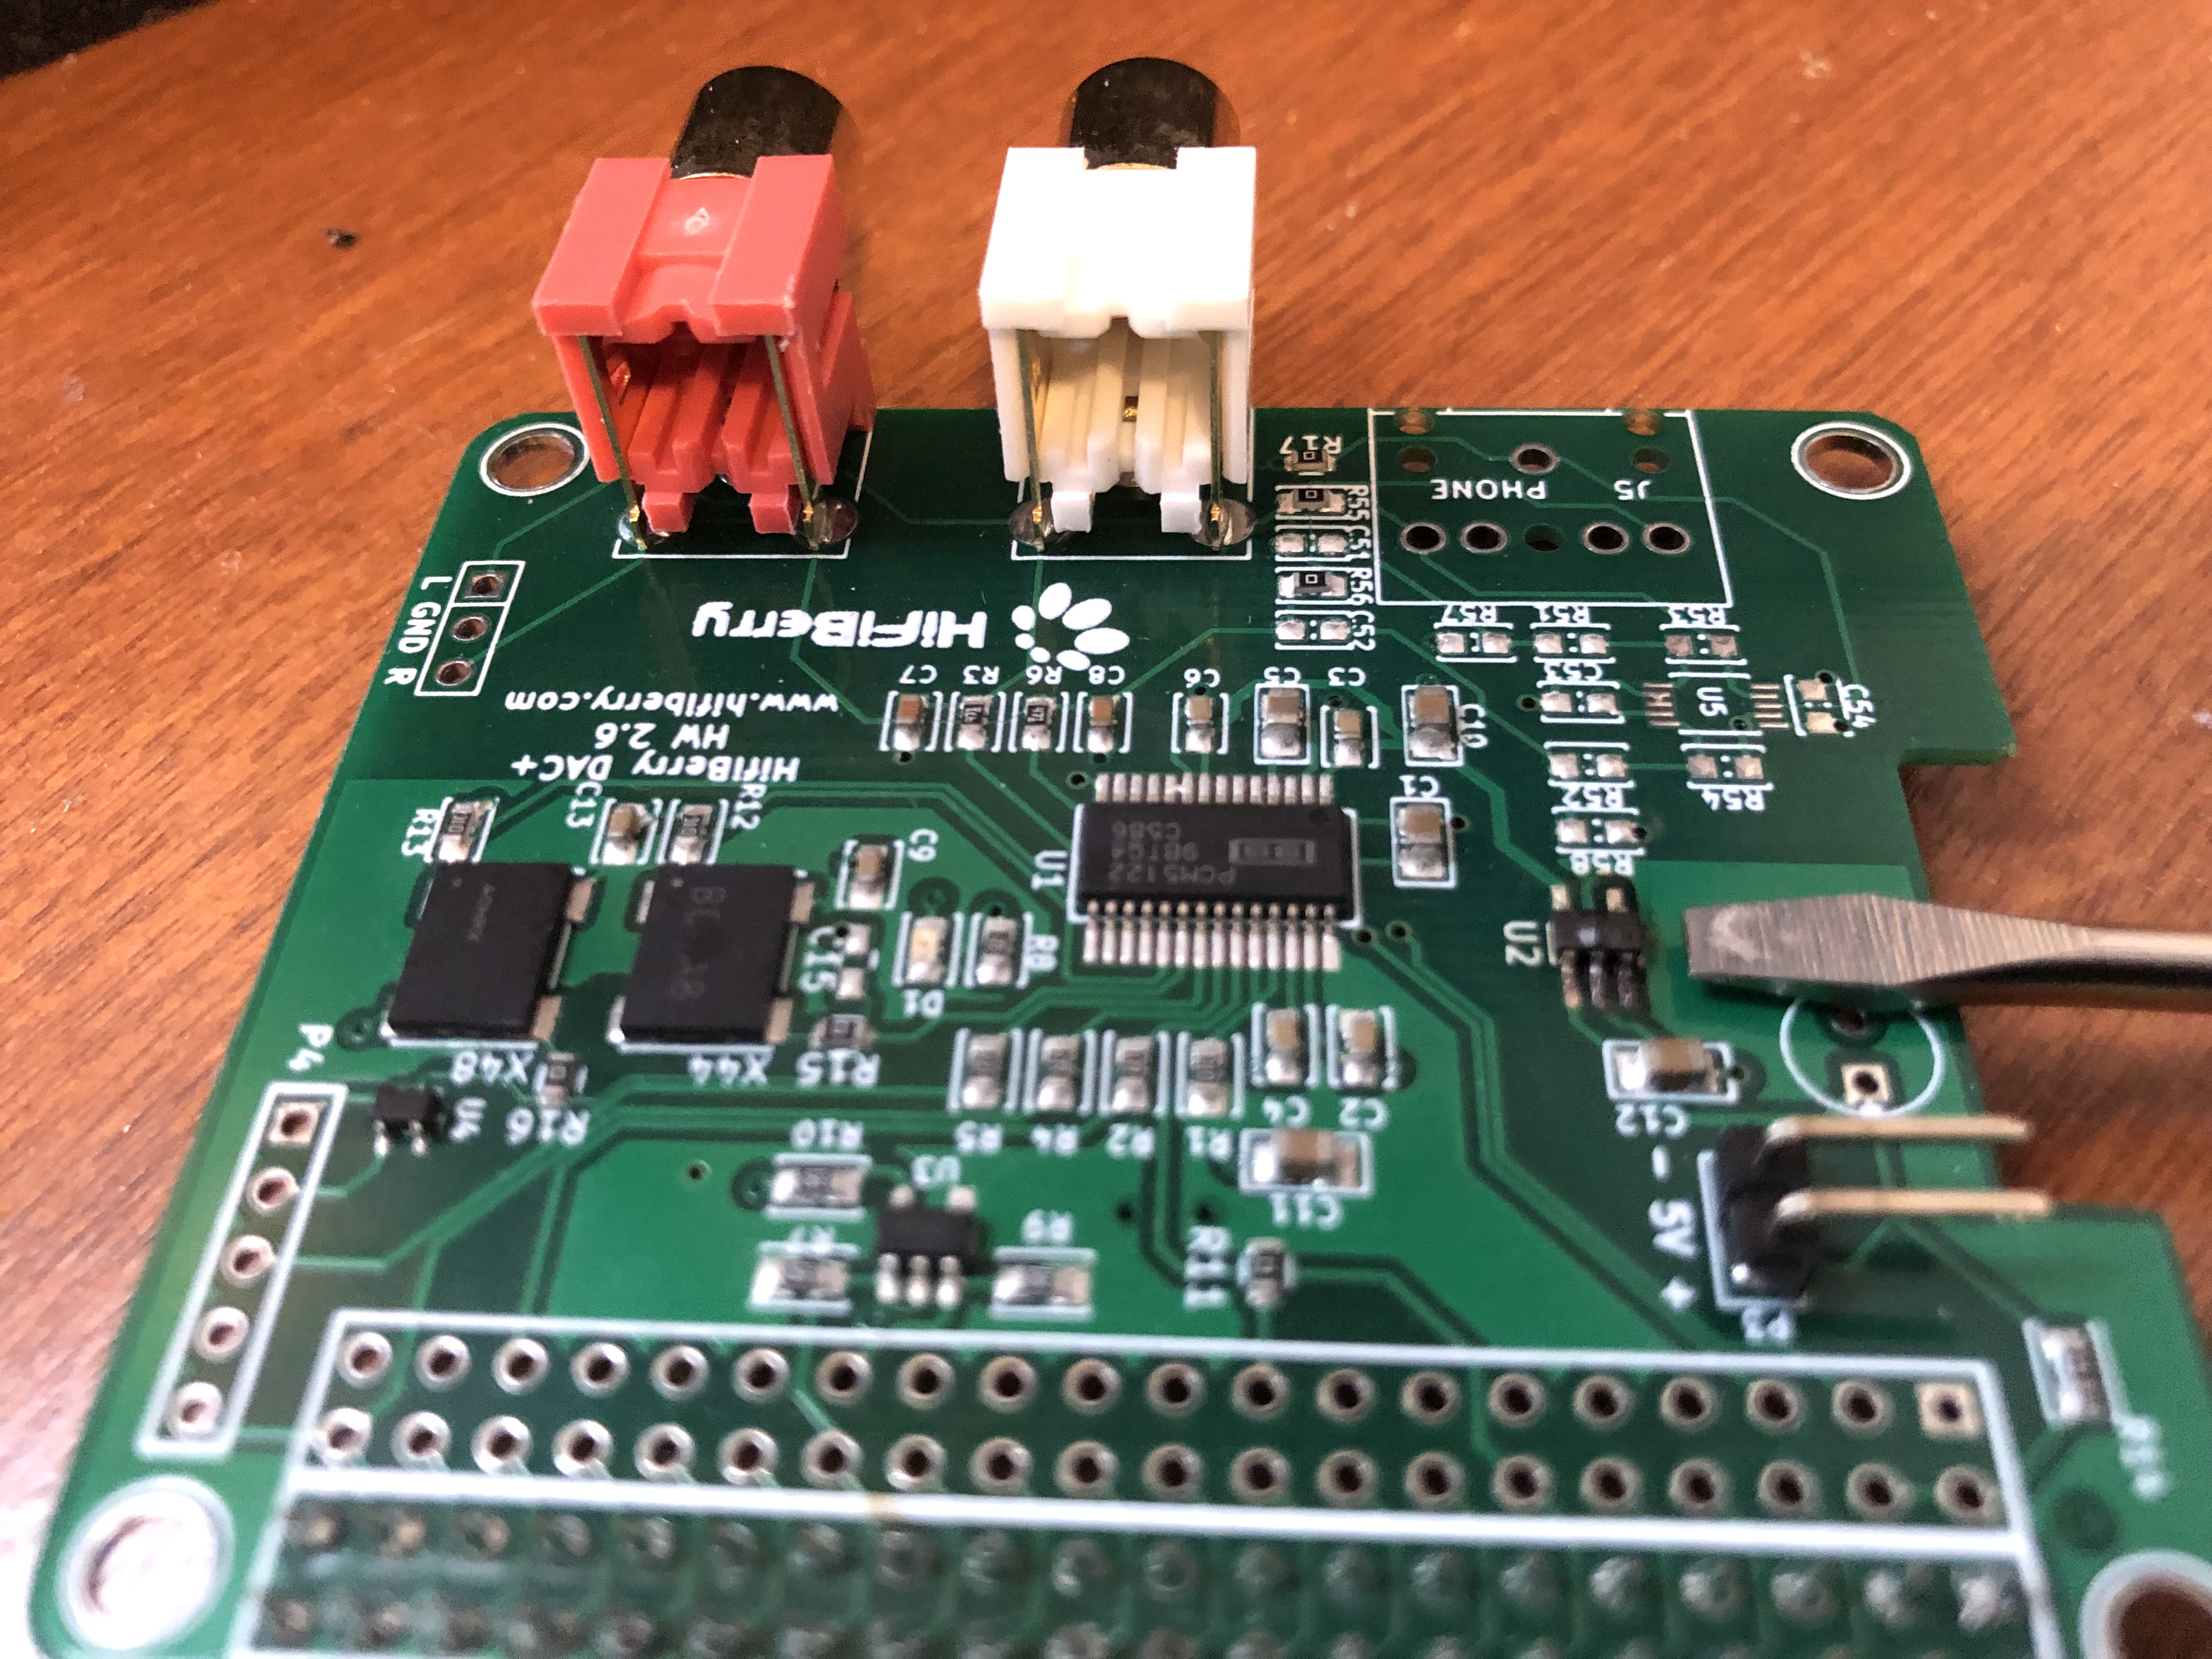
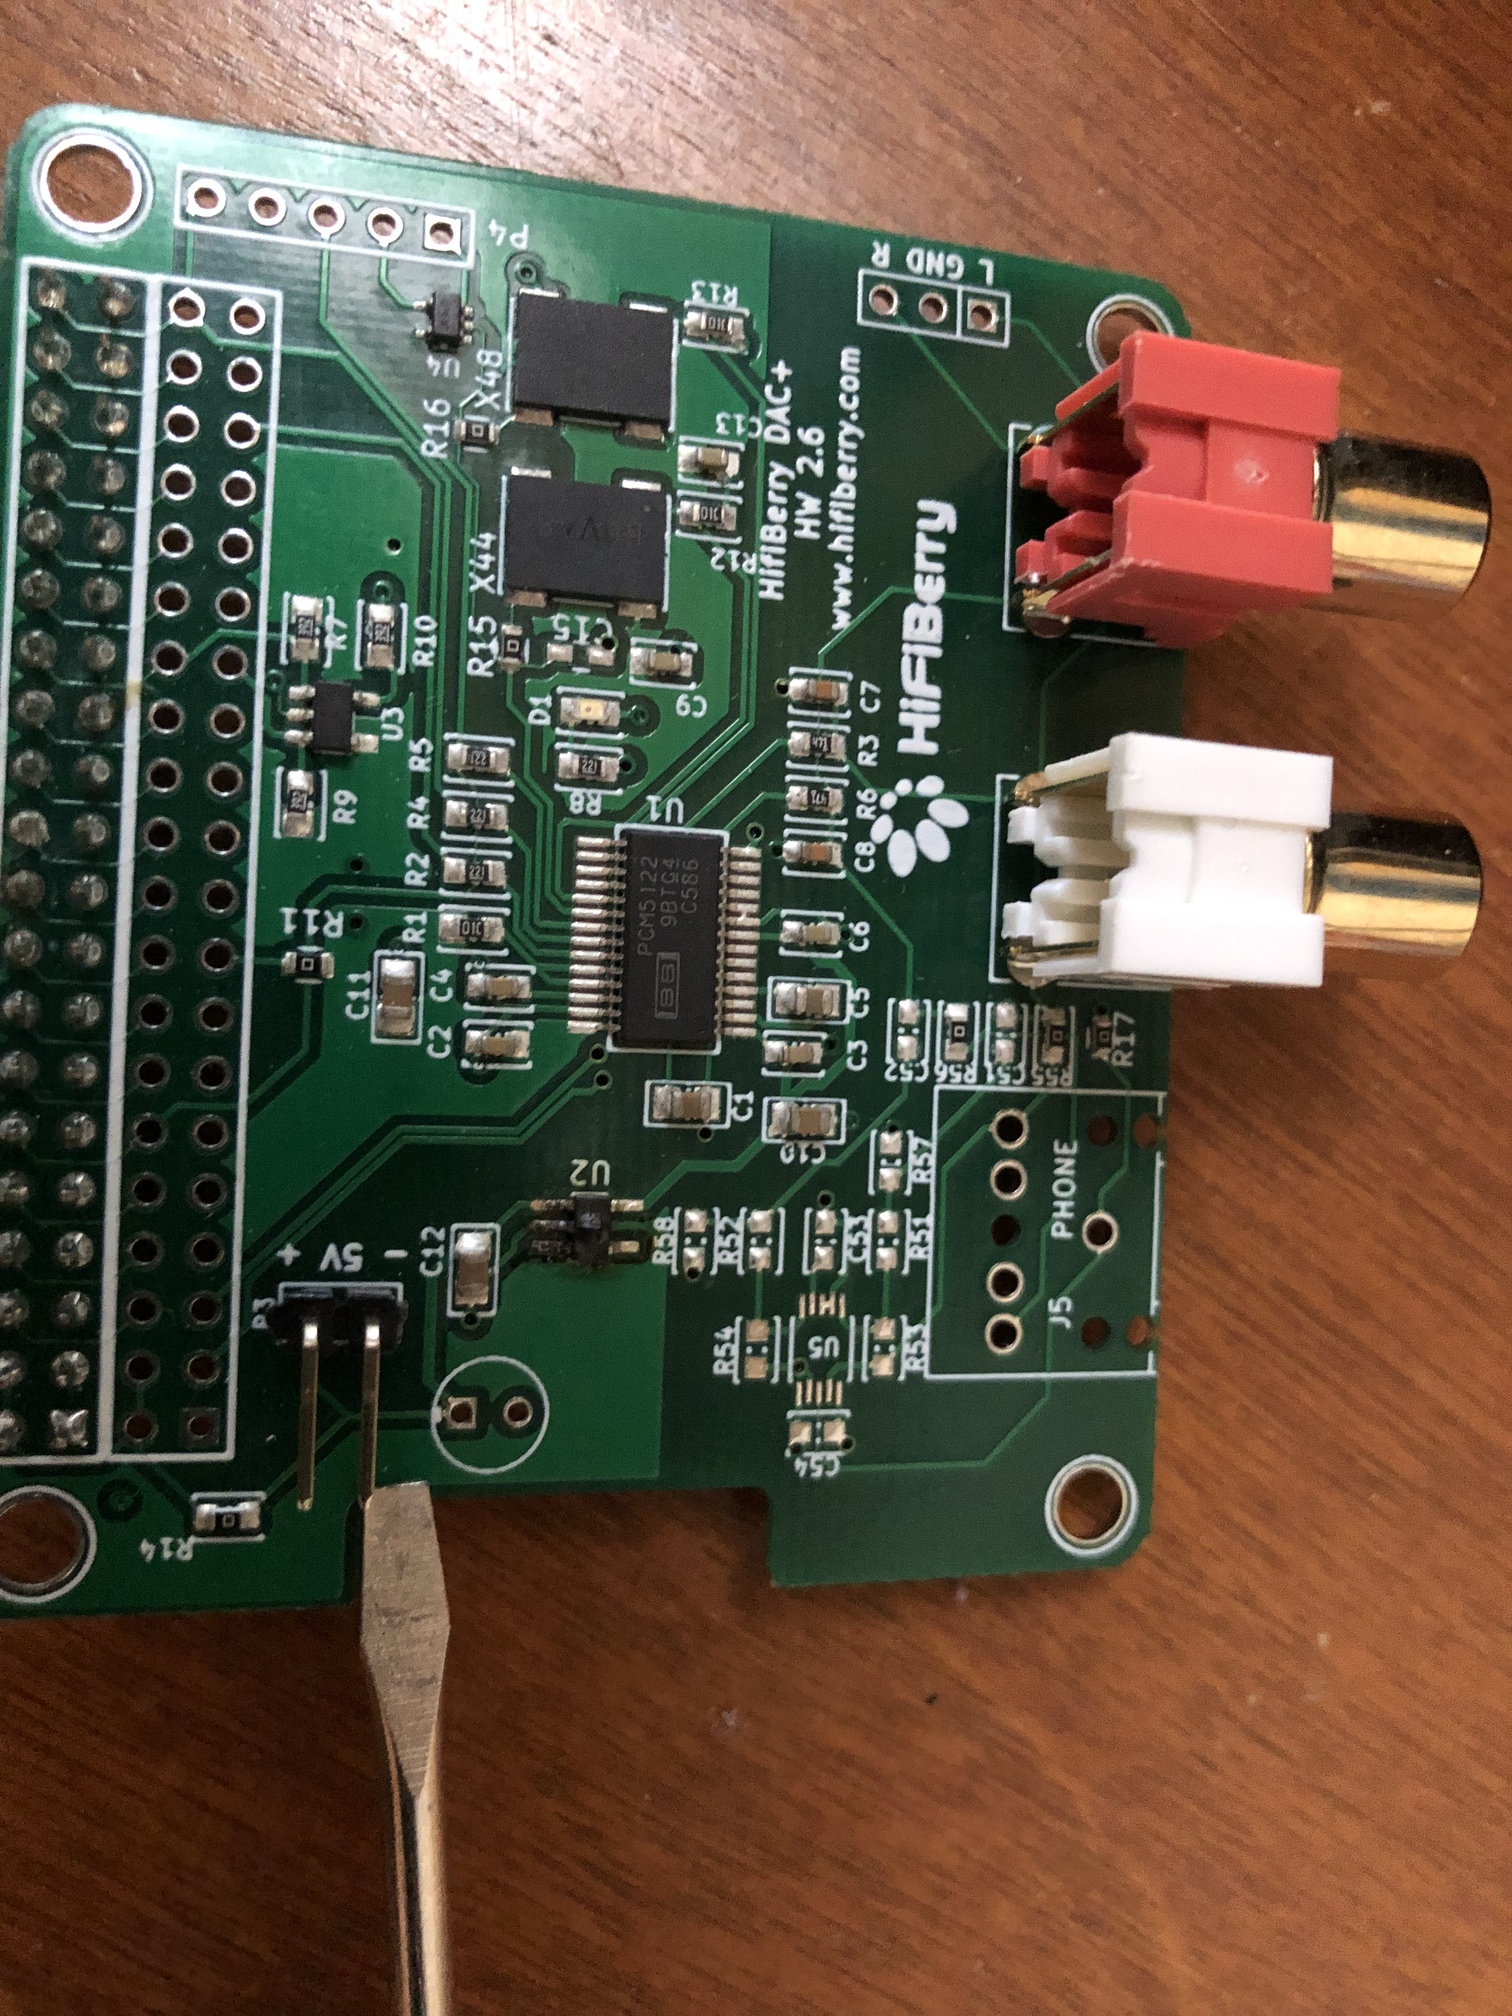
So the GPIO ribbon cable came in to hook up my HiFiBerry DAC+ Pro and for some reason the “magic smoke” got let out and I’m 99% positive the DAC is toast.
Before I order and then screw up another DAC (this time the Dac 2 Pro, or Digi 2 Pro), can someone look at this for me and let me know if I did something wrong.
I had everything connected like the below, just add in a 40 pin GPIO ribbon cable on the middle slot, which was connected to the HiFiBerry DAC+ Pro.

I previously had connected the screen to the 5v output from the HiFiBerry DAC+ Pro , but figured I didn’t need to do that anymore and could use the GPIO extension header. The wiring was setup as follows:
link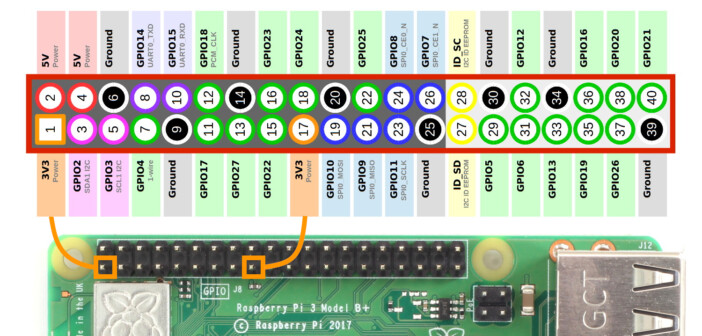
- IR connected to pins 1 (3v3), 11 (GPIO17), 25 (Ground)
- 7" Touchscreen connected to pins 2 (5v), 6 (ground)
- HiFiBerry connected to:
- pins 3 (GPIO2), pin 5 (GPIO3) → audio configuration
- pins 12 (GPIO18), 35 (GPIO19), 38 (GPIO20) and 40 (GPIO21) → sound interface
- Per HiFiBerry Pin 27 (ID_SD) and 28 (ID_SC) are always reserved for an ID EEPROM on the Raspberry Pi. Independently which card you use, these pins are always reserved and should never be used to connect external components.
I’m not too sure what messed up.
I’ve included a picture of the damaged area below, with the screwdriver pointing to it, and the documentation from HiFiBerry
Here is where the screen previously was connected
-------------------------HiFiBerrySupportDocumentation------------------
The HiFiBerry support page also lists this information:
GPIO USAGE OF HIFIBERRY BOARDS
We know that many people like to add additional hardware components (LCDs, buttons, etc.) to their Raspberry Pi. We provide this documentation to help you with this. However:
- We do not guarantee interoperability with any other add-on card. Even if another card is not using the same GPIOs, there are many other things that might prevent interoperability. The Raspberry Pi GPIOs are not designed as a bus system (even the I2C bus can’t be simply used by multiple cards as there might or might not be the right pull-up resistors on every I2C slave).
- Soldering on the HiFiBerry board voids warranty. There is no replacement for boards that have been modified.
- There is no support from us. You can ask questions in our community area. There are already interesting projects and other users might help you.
- Do not use more than a few mA from the 3.3V line. If your circuit requires 3.3V, use the 5V power rail of the Raspberry Pi with an additional voltage regulator.
- Pin 27 and 28 are always reserved for an ID EEPROM on the Raspberry Pi. Independently which card you use, these pins are always reserved and should never be used to connect external components.
HIFIBERRY DAC+, DAC+ ADC, DIGI+ AND AMP+, DAC2 PRO
GPIO2-3 (pins 3 and 5) are used by our products for configuration. If you are experienced with I2C, you might add other slave devices. If you a a novice, we don’t recommend this at all.
GPIOs 18-21 (pins 12, 35, 38 and 40) are used for the sound interface. You can’t use them for any other purpose.
Just to drop in yet another lirc.conf file, I created one today for the PDP Gaming Remote Control: Xbox Series X|S, Xbox One, Xbox. The existing Xbox One Remote did not work. And this file looked more like the others I’ve seen, unlike the A2194 one I created.
# Please make this file available to others
# by sending it to <lirc@bartelmus.de>
#
# this config file was automatically generated
# using lirc-0.9.0-pre1(default) on Fri Oct 15 16:09:39 2021
#
# contributed by
#
# brand:                      PDP Gaming Media Remote Xbox Series X|S, Xbox One
#                             home/volumio/XboxOne_lircd.conf
# model no. of remote control: B08FCVG5DX
# devices being controlled by this remote:
#

begin remote

  name  /home/volumio/XboxOne_lircd.conf
  bits           16
  flags SPACE_ENC|CONST_LENGTH
  eps            30
  aeps          100

  header       8977  4567
  one           596  1687
  zero          596   531
  ptrail        596
  repeat       8978  2273
  pre_data_bits   16
  pre_data       0x11B
  gap          108399
  min_repeat      1
#  suppress_repeat 1
#  uncomment to suppress unwanted repeats
  toggle_bit_mask 0x0

      begin codes
          KEY_POWER             0x26D9
          KEY_ZOOM                 0x7689
          KEY_TITLE                 0xF609
          KEY_UP                   0x7887
          KEY_DOWN                 0xF807
          KEY_LEFT                 0x04FB
          KEY_RIGHT                0x847B
          KEY_OK                   0x44BB
          KEY_X                    0x16E9
          KEY_Y                    0xE619
          KEY_A                    0x6699
          KEY_B                    0xA659
          KEY_REWIND               0xA857
          KEY_FASTFORWARD          0x28D7
          KEY_PLAY                 0x0EF1
          KEY_BACK                 0xC43B
          KEY_MUTE                 0x708F
          KEY_VOLUMEUP             0x08F7
          KEY_VOLUMEDOWN           0x8877
          KEY_CHANNELUP            0x48B7
          KEY_CHANNELDOWN          0xC837
      end codes

end remote
Ok, so I’m back. I spent a few sleepless nights figuring out what went wrong with the prior setup as I let out the magic smoke…
After lots of looking and a couple comments on the hifiberry forum they seemed to indicate it might be due to using a GPIO ribbon cable. I also wondered if pulling off the 3.3v was also a mistake, (see note below from hifiberry site)
- Do not use more than a few mA from the 3.3V line. If your circuit requires 3.3V, use the 5V power rail of the Raspberry Pi with an additional voltage regulator.
So I bit the bullet and:
- Got a new HiFiBerry, and went for the Dac2 Pro
- To play it safe, decided to power the PI + DAC and Touchscreen independently via a Micro-USB splitter
- To go even farther, decided to tap the 5v output from the DAC, but use a in-line step-down converter to bring it down to 3.3v. After all that work, it is working out just fine.
Now after all that, I dug in deeper to the LIRC for the PDP remote and have it somewhat configured the way I want. But I have quite a few un-used buttons, which leads to the next question:
Has anyone figured out how to call the spotify app?
I’m hoping to be able to call spotify, and under my account, call a specific playlist…
Is the IR remote controller plugin ready for volumio 3? I would like to know before I hit the v2 to v3 upgrade button since this plugin is key to volumio integrating with my hometheater setup.
1 Like
No yet, it’s pending for approval.
Cool! then we are waiting impatiently  for me, this plugin also plays a key role in controlling the equipment
1 Like
same for me.
hopefully it will be ready soon, waiting to upgrade 3 RPI’s
1 Like
+1
I just upgraded to Volumio 3 and to my surprise I can’t use my remote anymore 
1 Like
Hi @gvolt , I’m wondering what is missing for the approval, and if there is any relevant issue still pending.
I tried to manually download and install your last commit, rel. 3.4.6 , and it seems to work flawlessly.
Thank you so much for your job, which I appreciated a lot.
Btw , for sake of completeness and for benefit of all : I use a common USB Microsoft IR Receiver; no need to act on any GPIO pin, and not any additional configuration either. Just plugged the USB IR Receiver and it worked instantly with a Samsung TV remote.
After struggling a bit, I’ve also successfully configured the lircd.conf and lircrc files for my Copland RC-102A remote.
Thx
@Fabian_Barile Thank you for your positive report. I don’t have any feedback on the PR yet and don’t know if there is a problem with the plugin.
Would you mind sharing these files so I could integrate them into a future version of the plugin?
Sure. See in attachment the Copland config files.
Copland RC 102A.zip (76.0 KB)
Notes :
- you’ll find in the zip package also the jpg picture of the remote, for reference. I guess the jpeg files will not be committed in the repository, unless in the future the plugin will have a preview/icon feature.
- lircd.conf has all the buttons codes , but in my personal use I have intentionally not mapped the Volume and Power buttons in the lircrc file , because they are for the ampli (I don’t use the software mixer and volume control from Volumio).
1 Like
I also tried the latest infrared version and it just works.
thanks again for the tip 
Hi! Can someone tell me where are you downloading the beta 3.4.6 version from?
I am happy to play the test - but somehow I can’t find anywhere …
you can download it here.
they are under accessories/ir_controller
Right here I have a problem … I don’t know how to download plugin files as zip package.
I already got another link and installed the plugin.
It works great both as a receiver and (after a slight modification of the configuration and connection of the transmitting diode) as a transmitter.
This way, you can control older music equipment (amplifier, CD, etc.) using scripts connected to the SSH Button application on your phone!
Cool! I recommend!
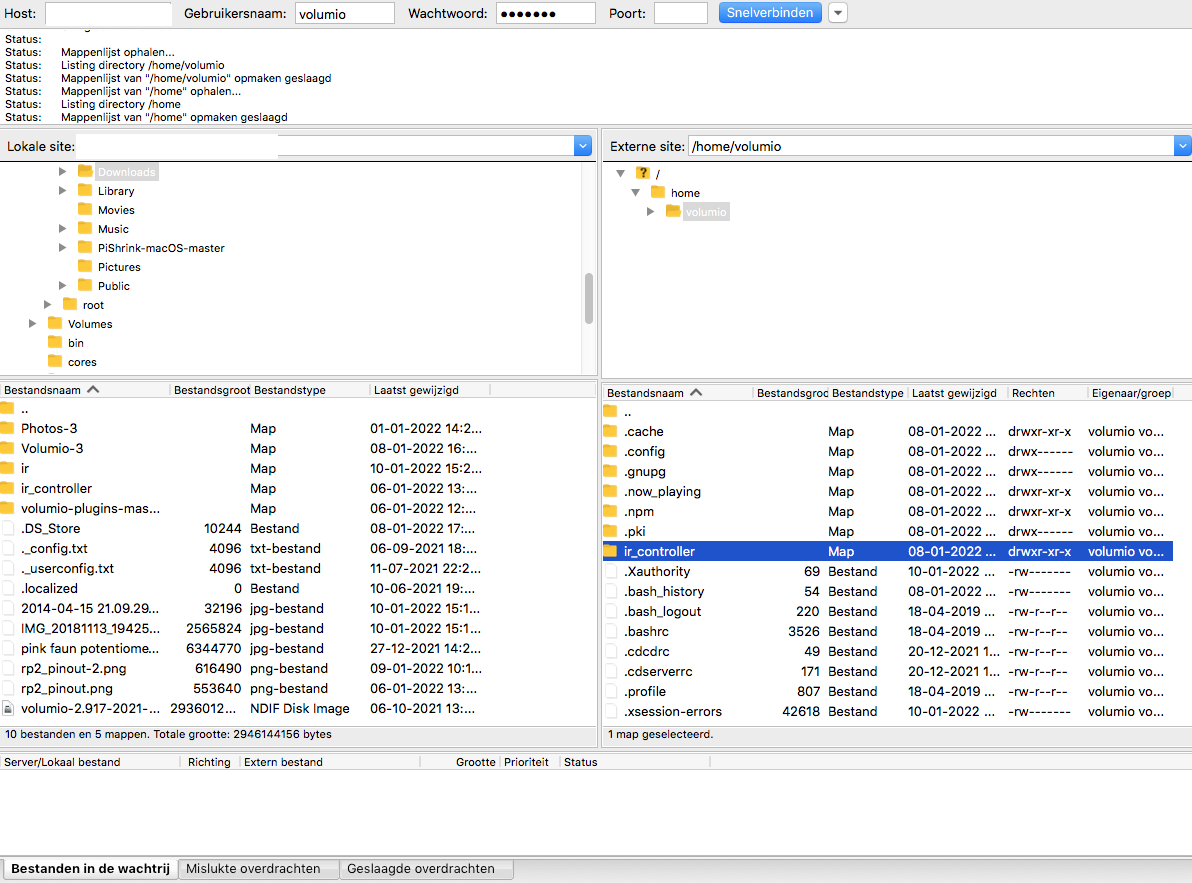
for example use a program like filezilla, log in and place the infrared file in home/volumio.
open terminal and ssh in your volumio player and type “cd /home/volumio/ir_controller” return, type “volumio plugin install” and the installation will begin.
when the installation is finished hold down “CTRL” and then c.
if everything went well you can use plugin.
How to download from Github
Uploading to RPI and installing is not a problem
@loup I assume you are running Volumio 3. The plugins sources for Volumio 3 you find here. For plugins which have not been approved you may get the files from a pull request.
Other than for Volumio 2 for Volumio 3 there are no publicly downloadable .zip files for each plugin AFAIK. So you would have to download each file manually - or you download the whole repository: If you don’t clone via git you can click on the green button named “Code” and choose “Download ZIP”. I think pull requests are not included in this download so in case of the “volumio-plugins-sources” repo you will receive only the content of the master branch.