My self-build volumio streamer

Made another streamer last week, now for my brother-in-law.

if you want to build it, below are the parts used for this project.
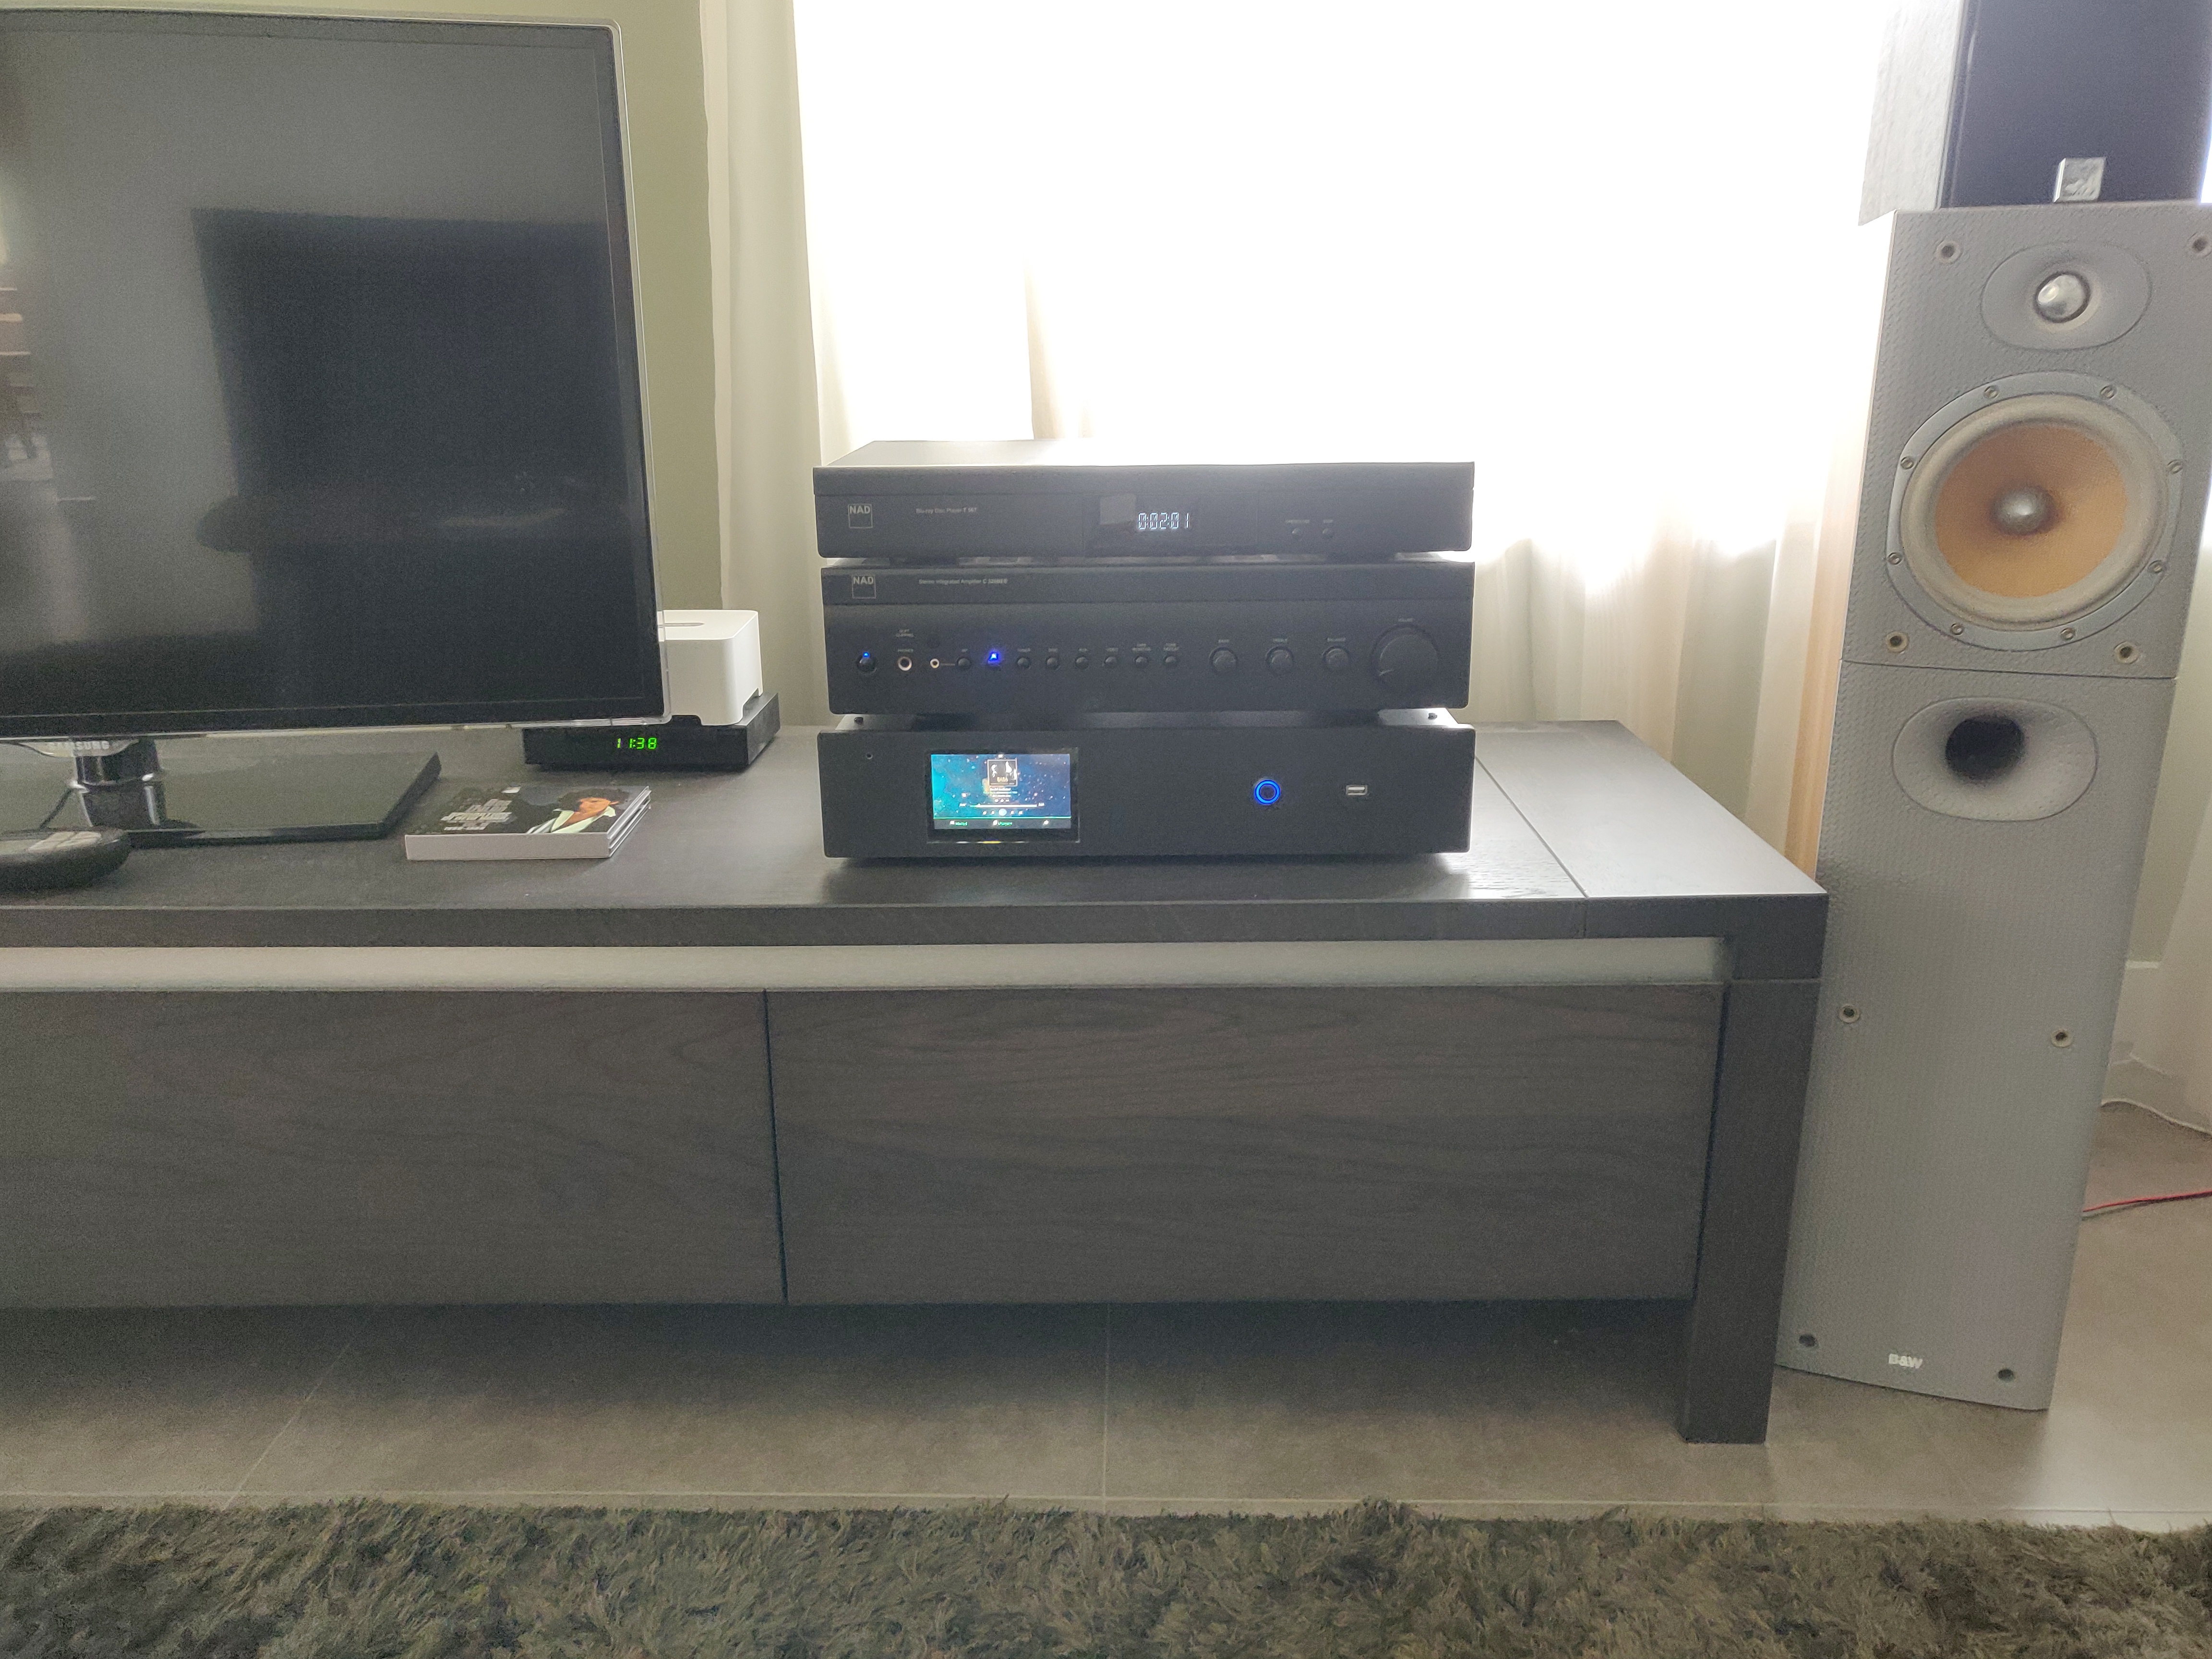
more photos are below.

pay attention! do not use the power supply Power Module A-19 2x3-20V LT1083, this will in principle get too hot and can cause problems in the long run.
therefore try to use another suitable power supply yourself.

see also post from @livs

a bit of soldering experience is a must.

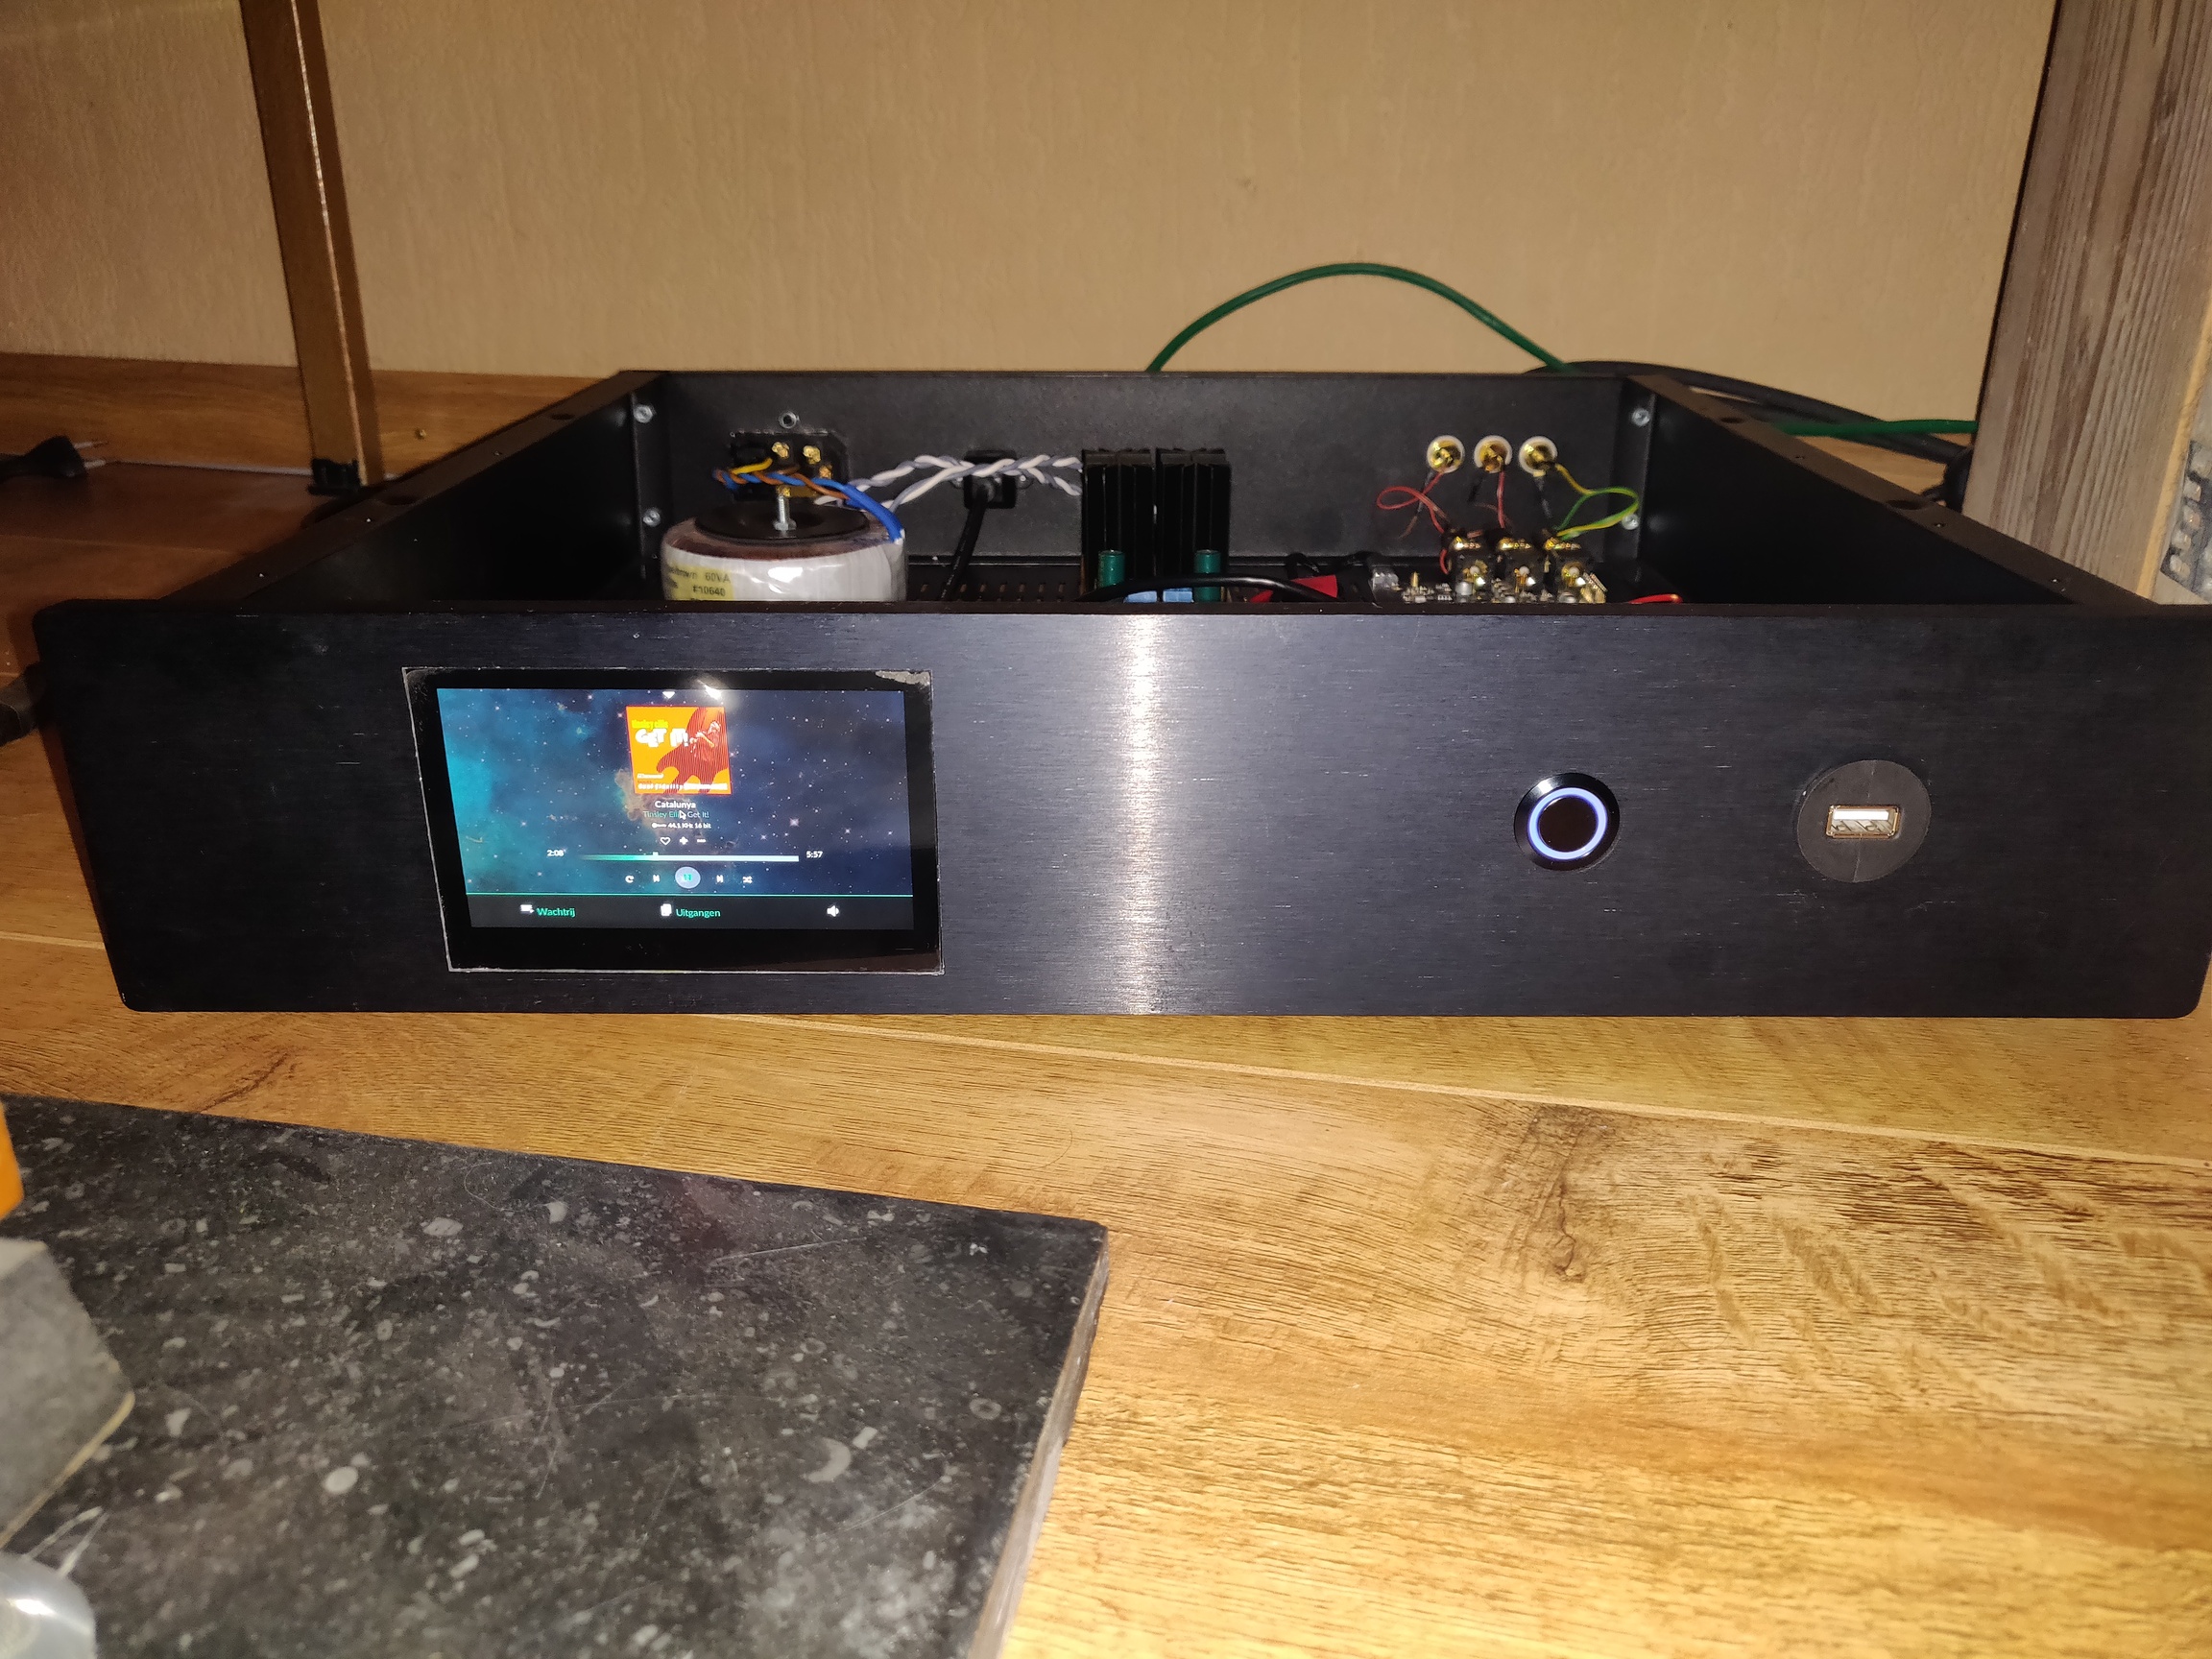
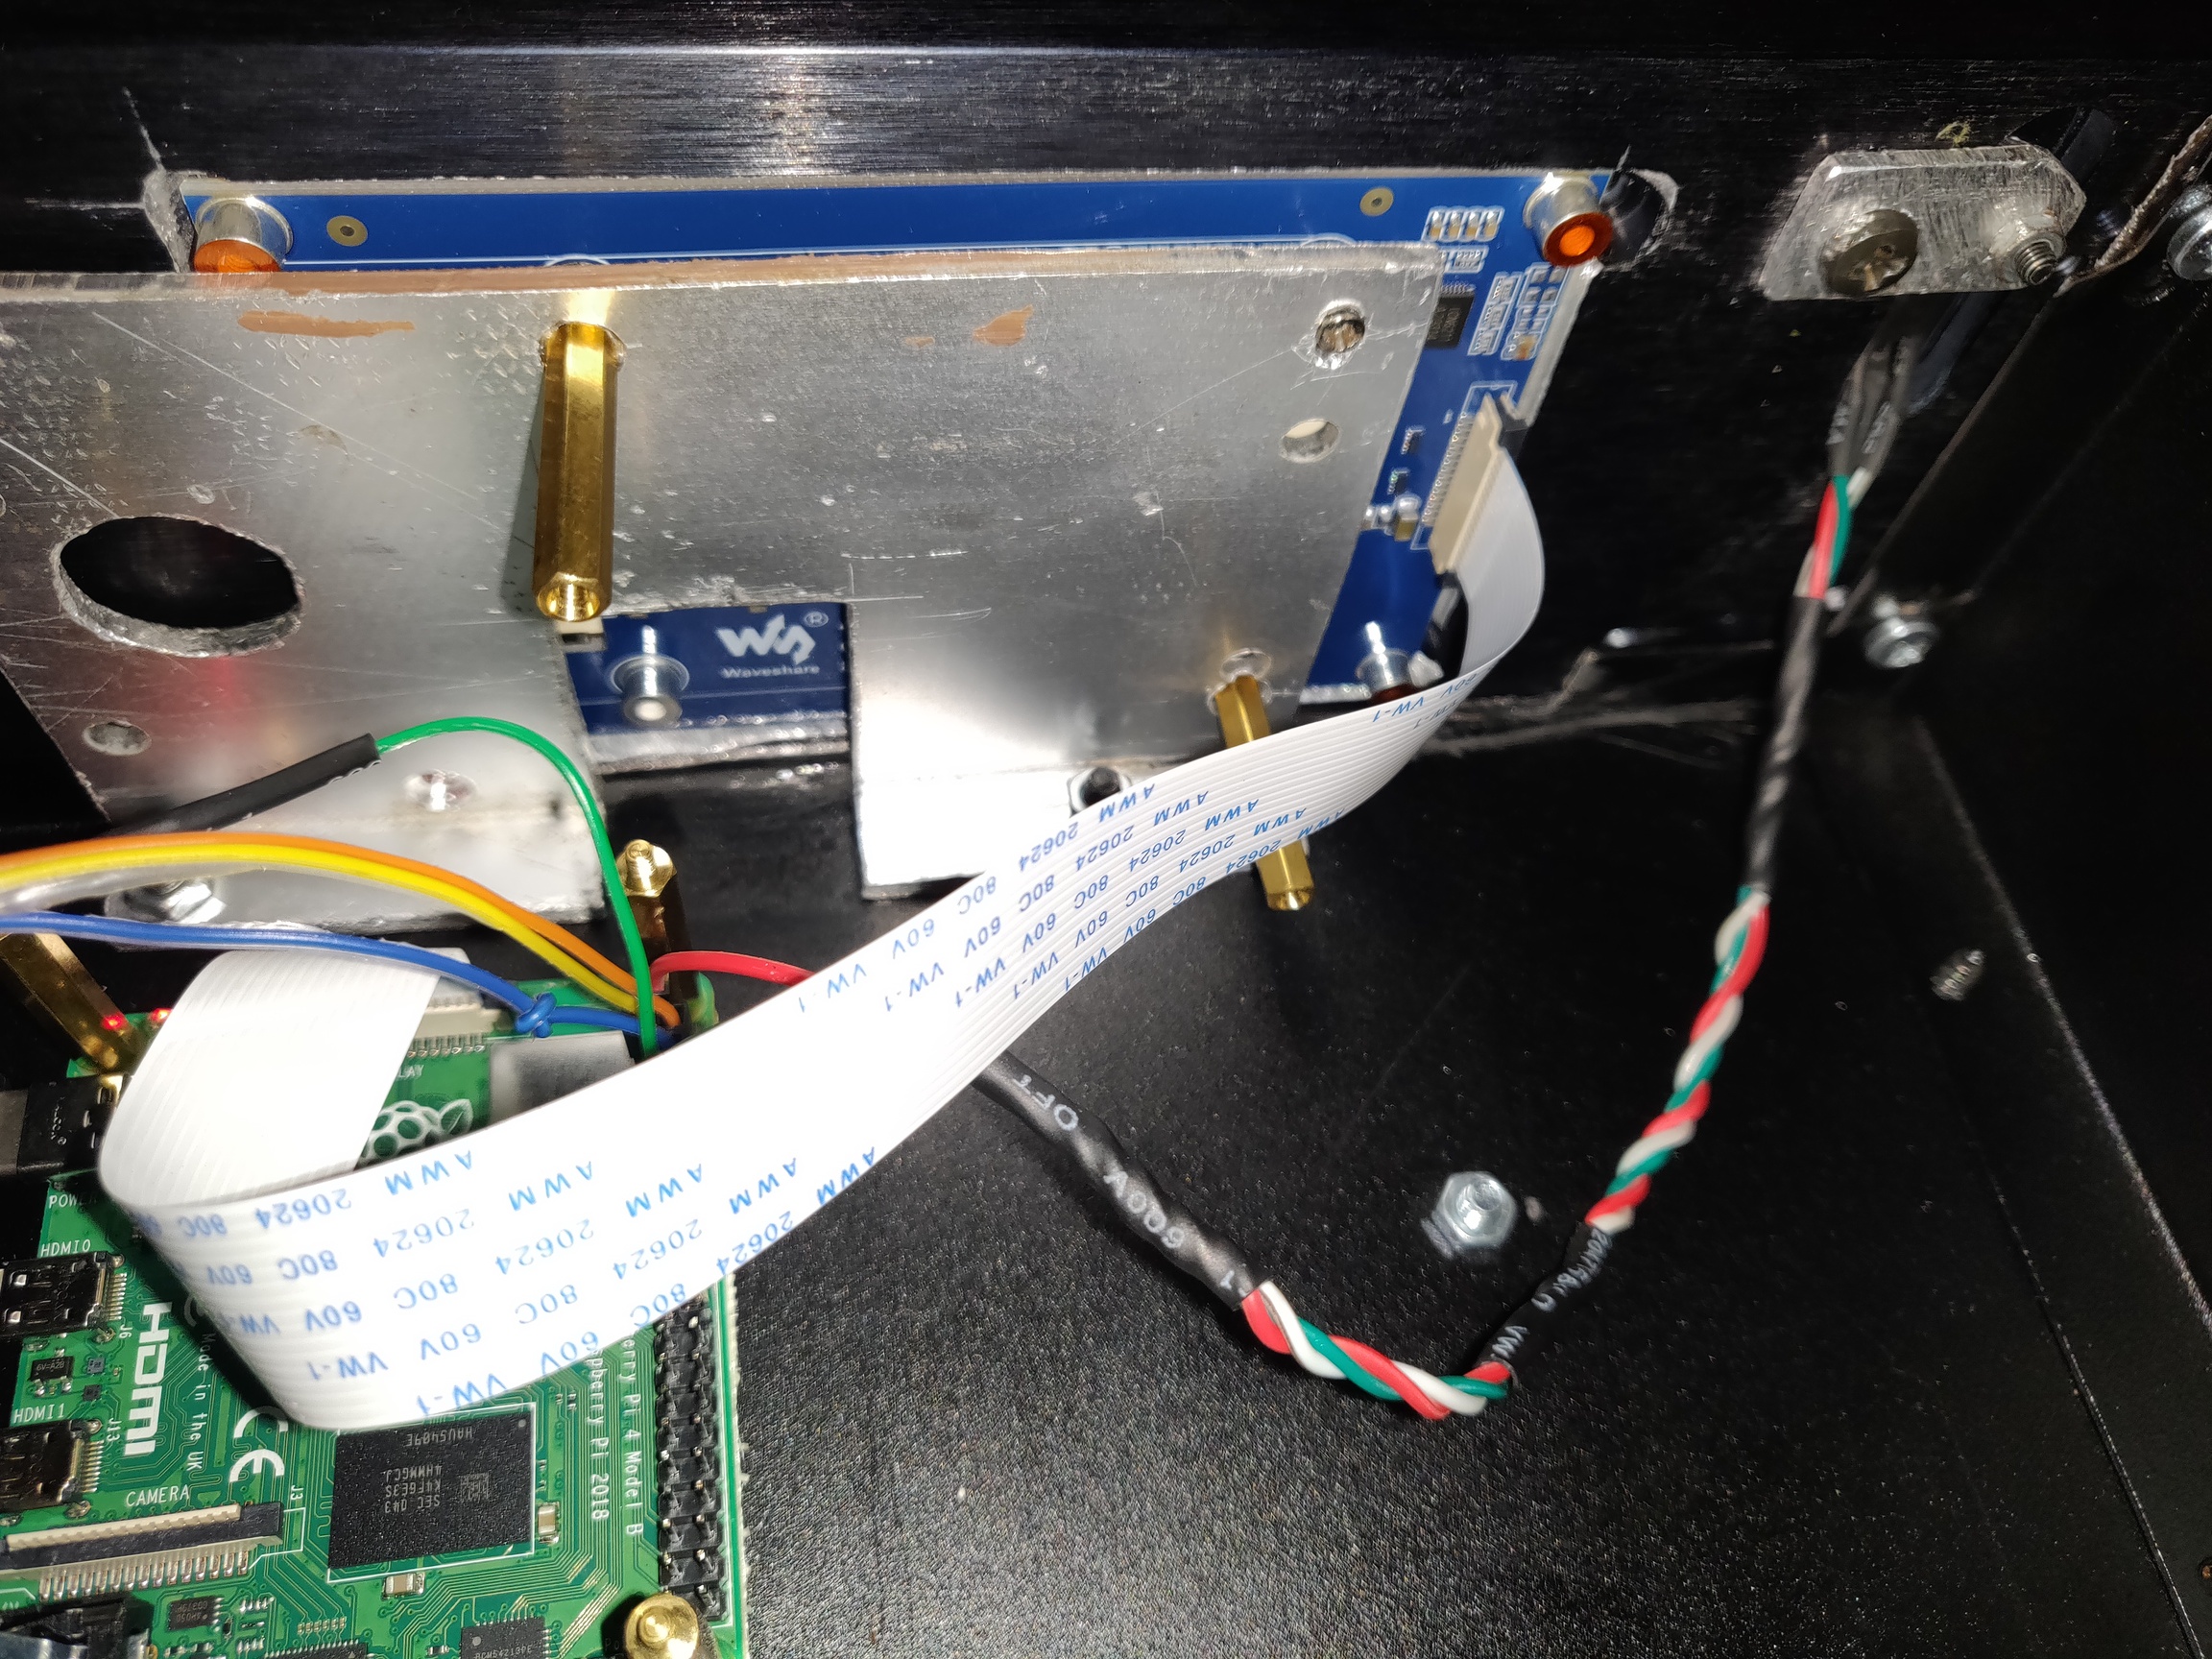
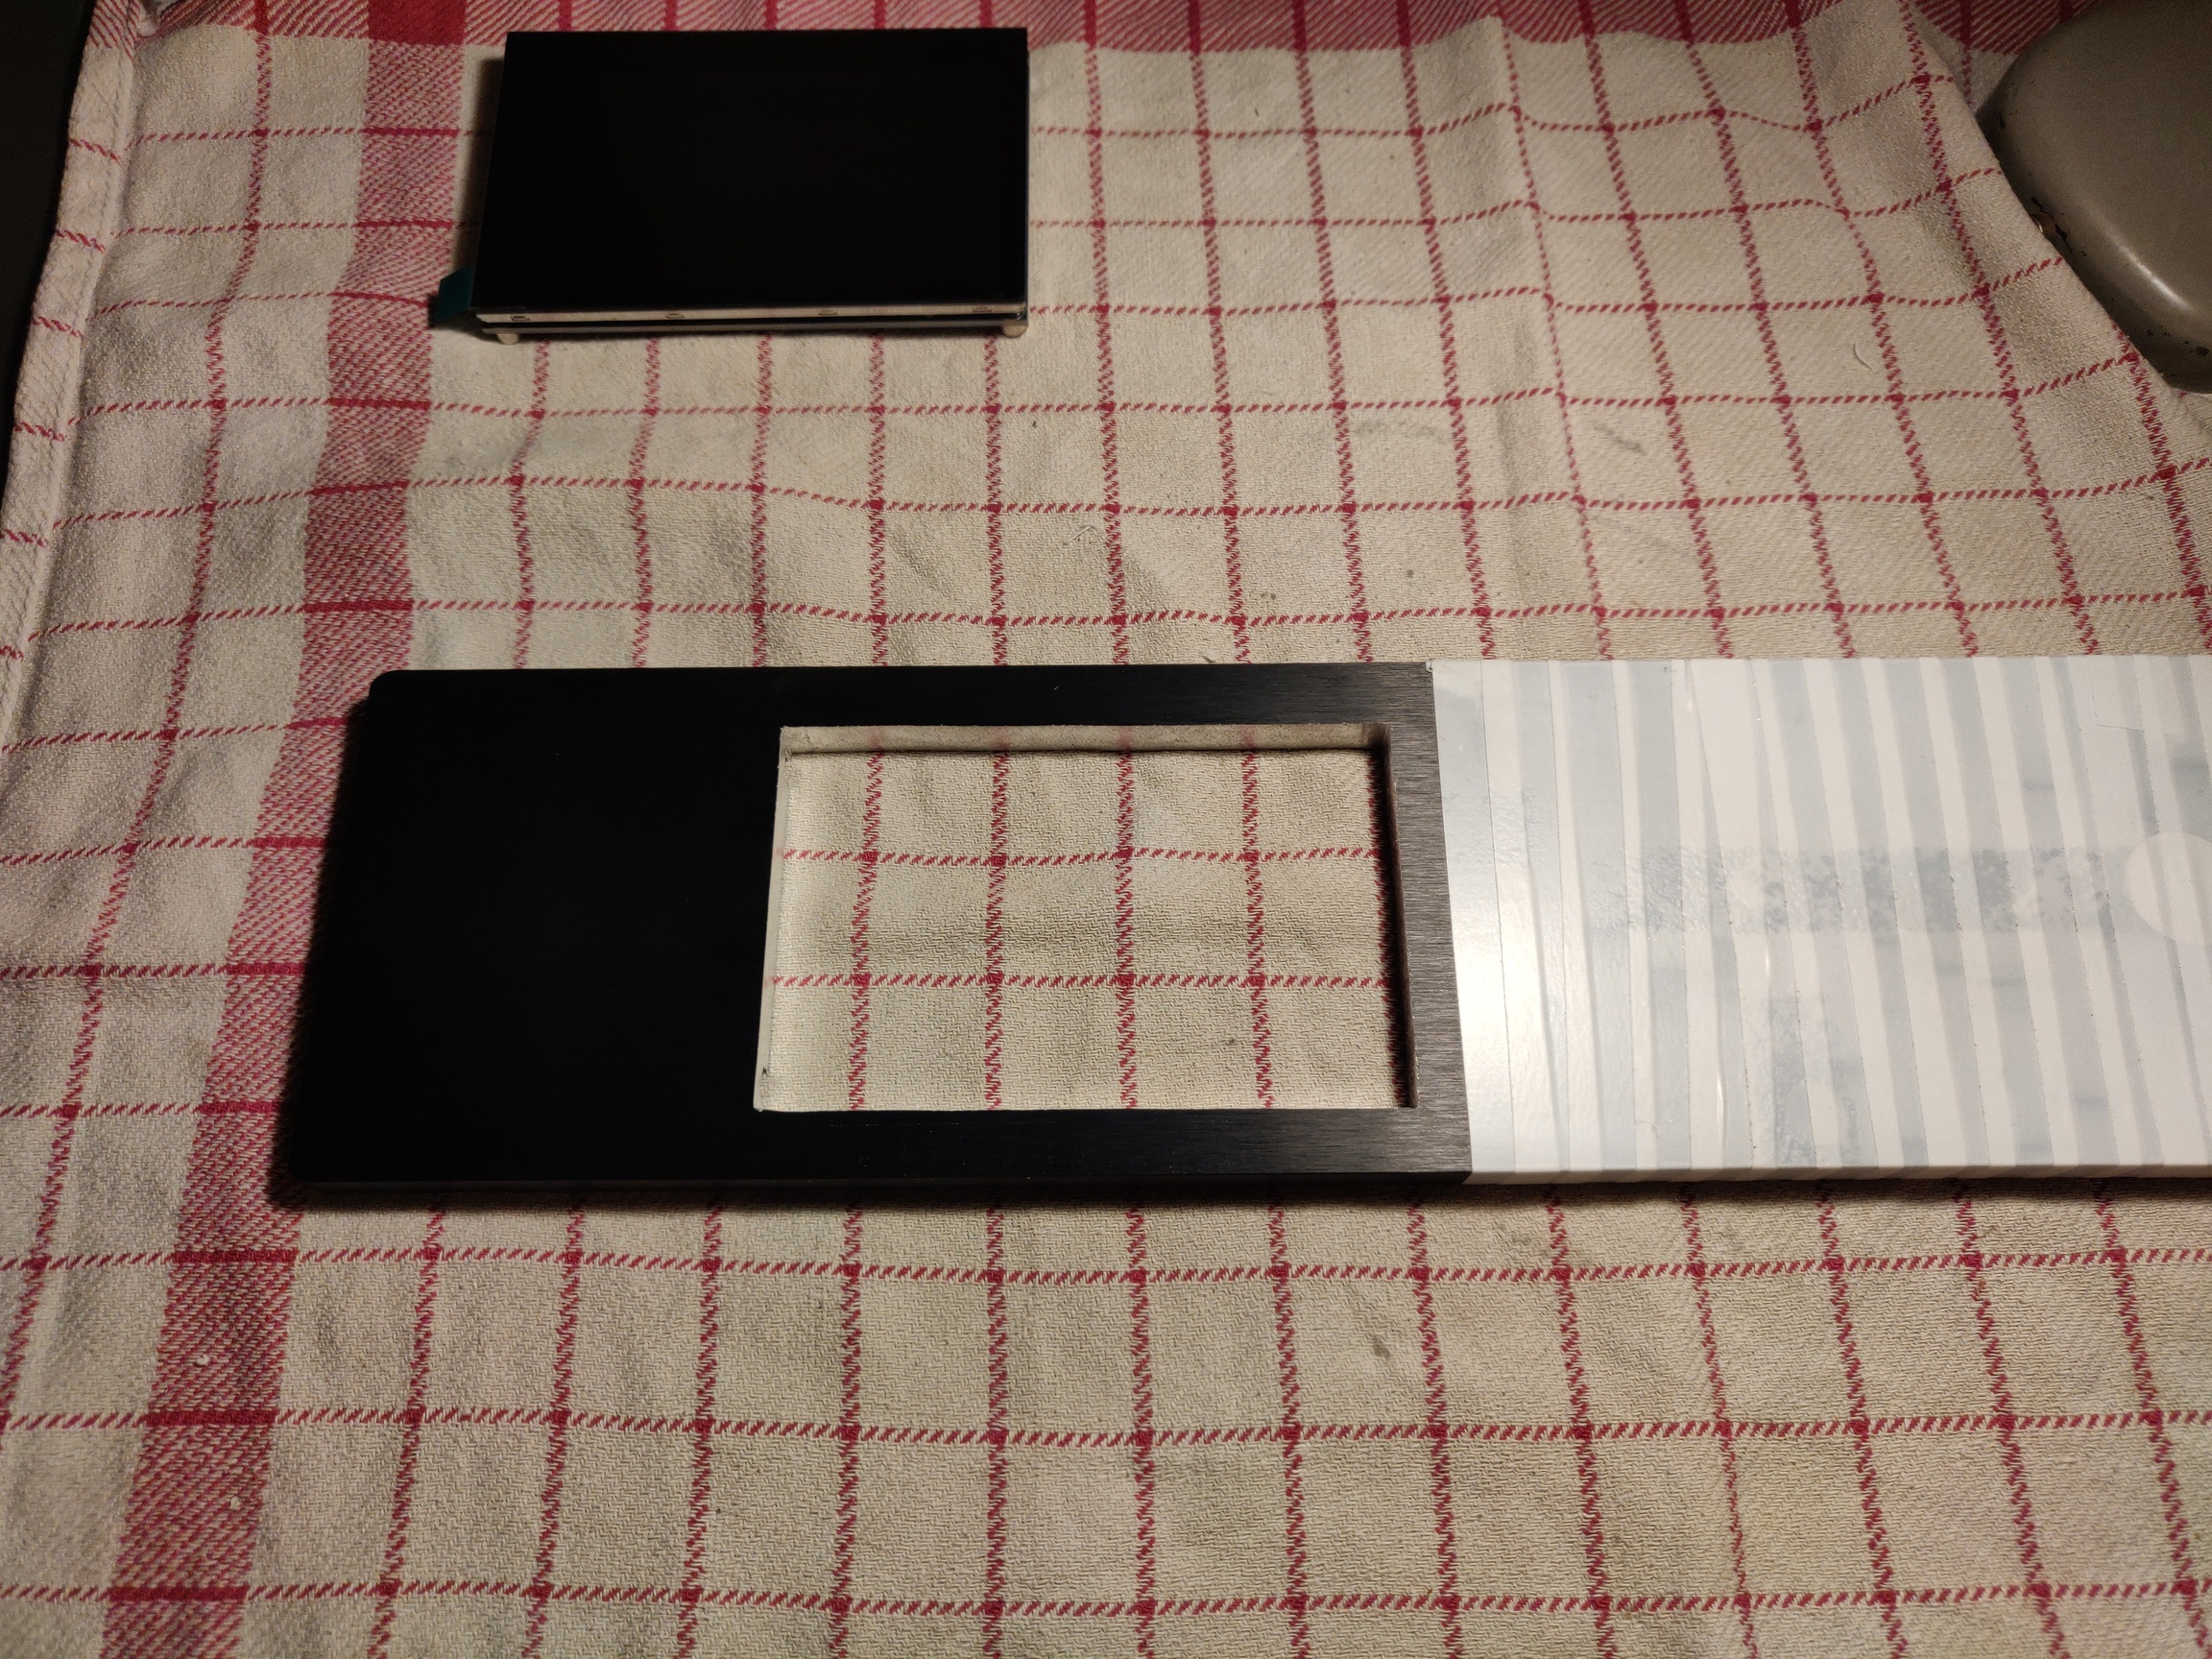
I did the cutout for the 4.3 inch SDI touch screen by hand, it is best to do this with a CNC machine.
see last photo how I secured/screwed this.

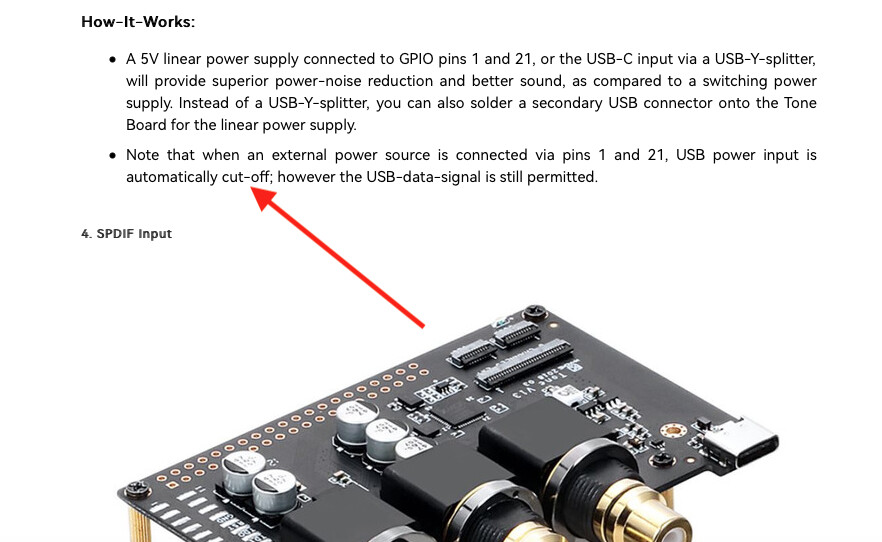
for the external 5volt for the khadas I use Solution 2 (warranty valid): , see link. https://www.khadas.com/post/tone-1-separating-data-power-connections

pay attention! make sure you use the correct polarity, if you do it wrong then the khadas will break … you have been warned!

so just use the supplied usb c cable and leave it intact and as an extra use the external 5 volts, it is automatically switched when it detects 5 volts.

it also makes no sense to separate the data and voltage lines of the usb c with a raspberry pi, this only works with a khadas vim board and not with a raspberry pi.

for those interested, here’s a review of the khadas tone1.


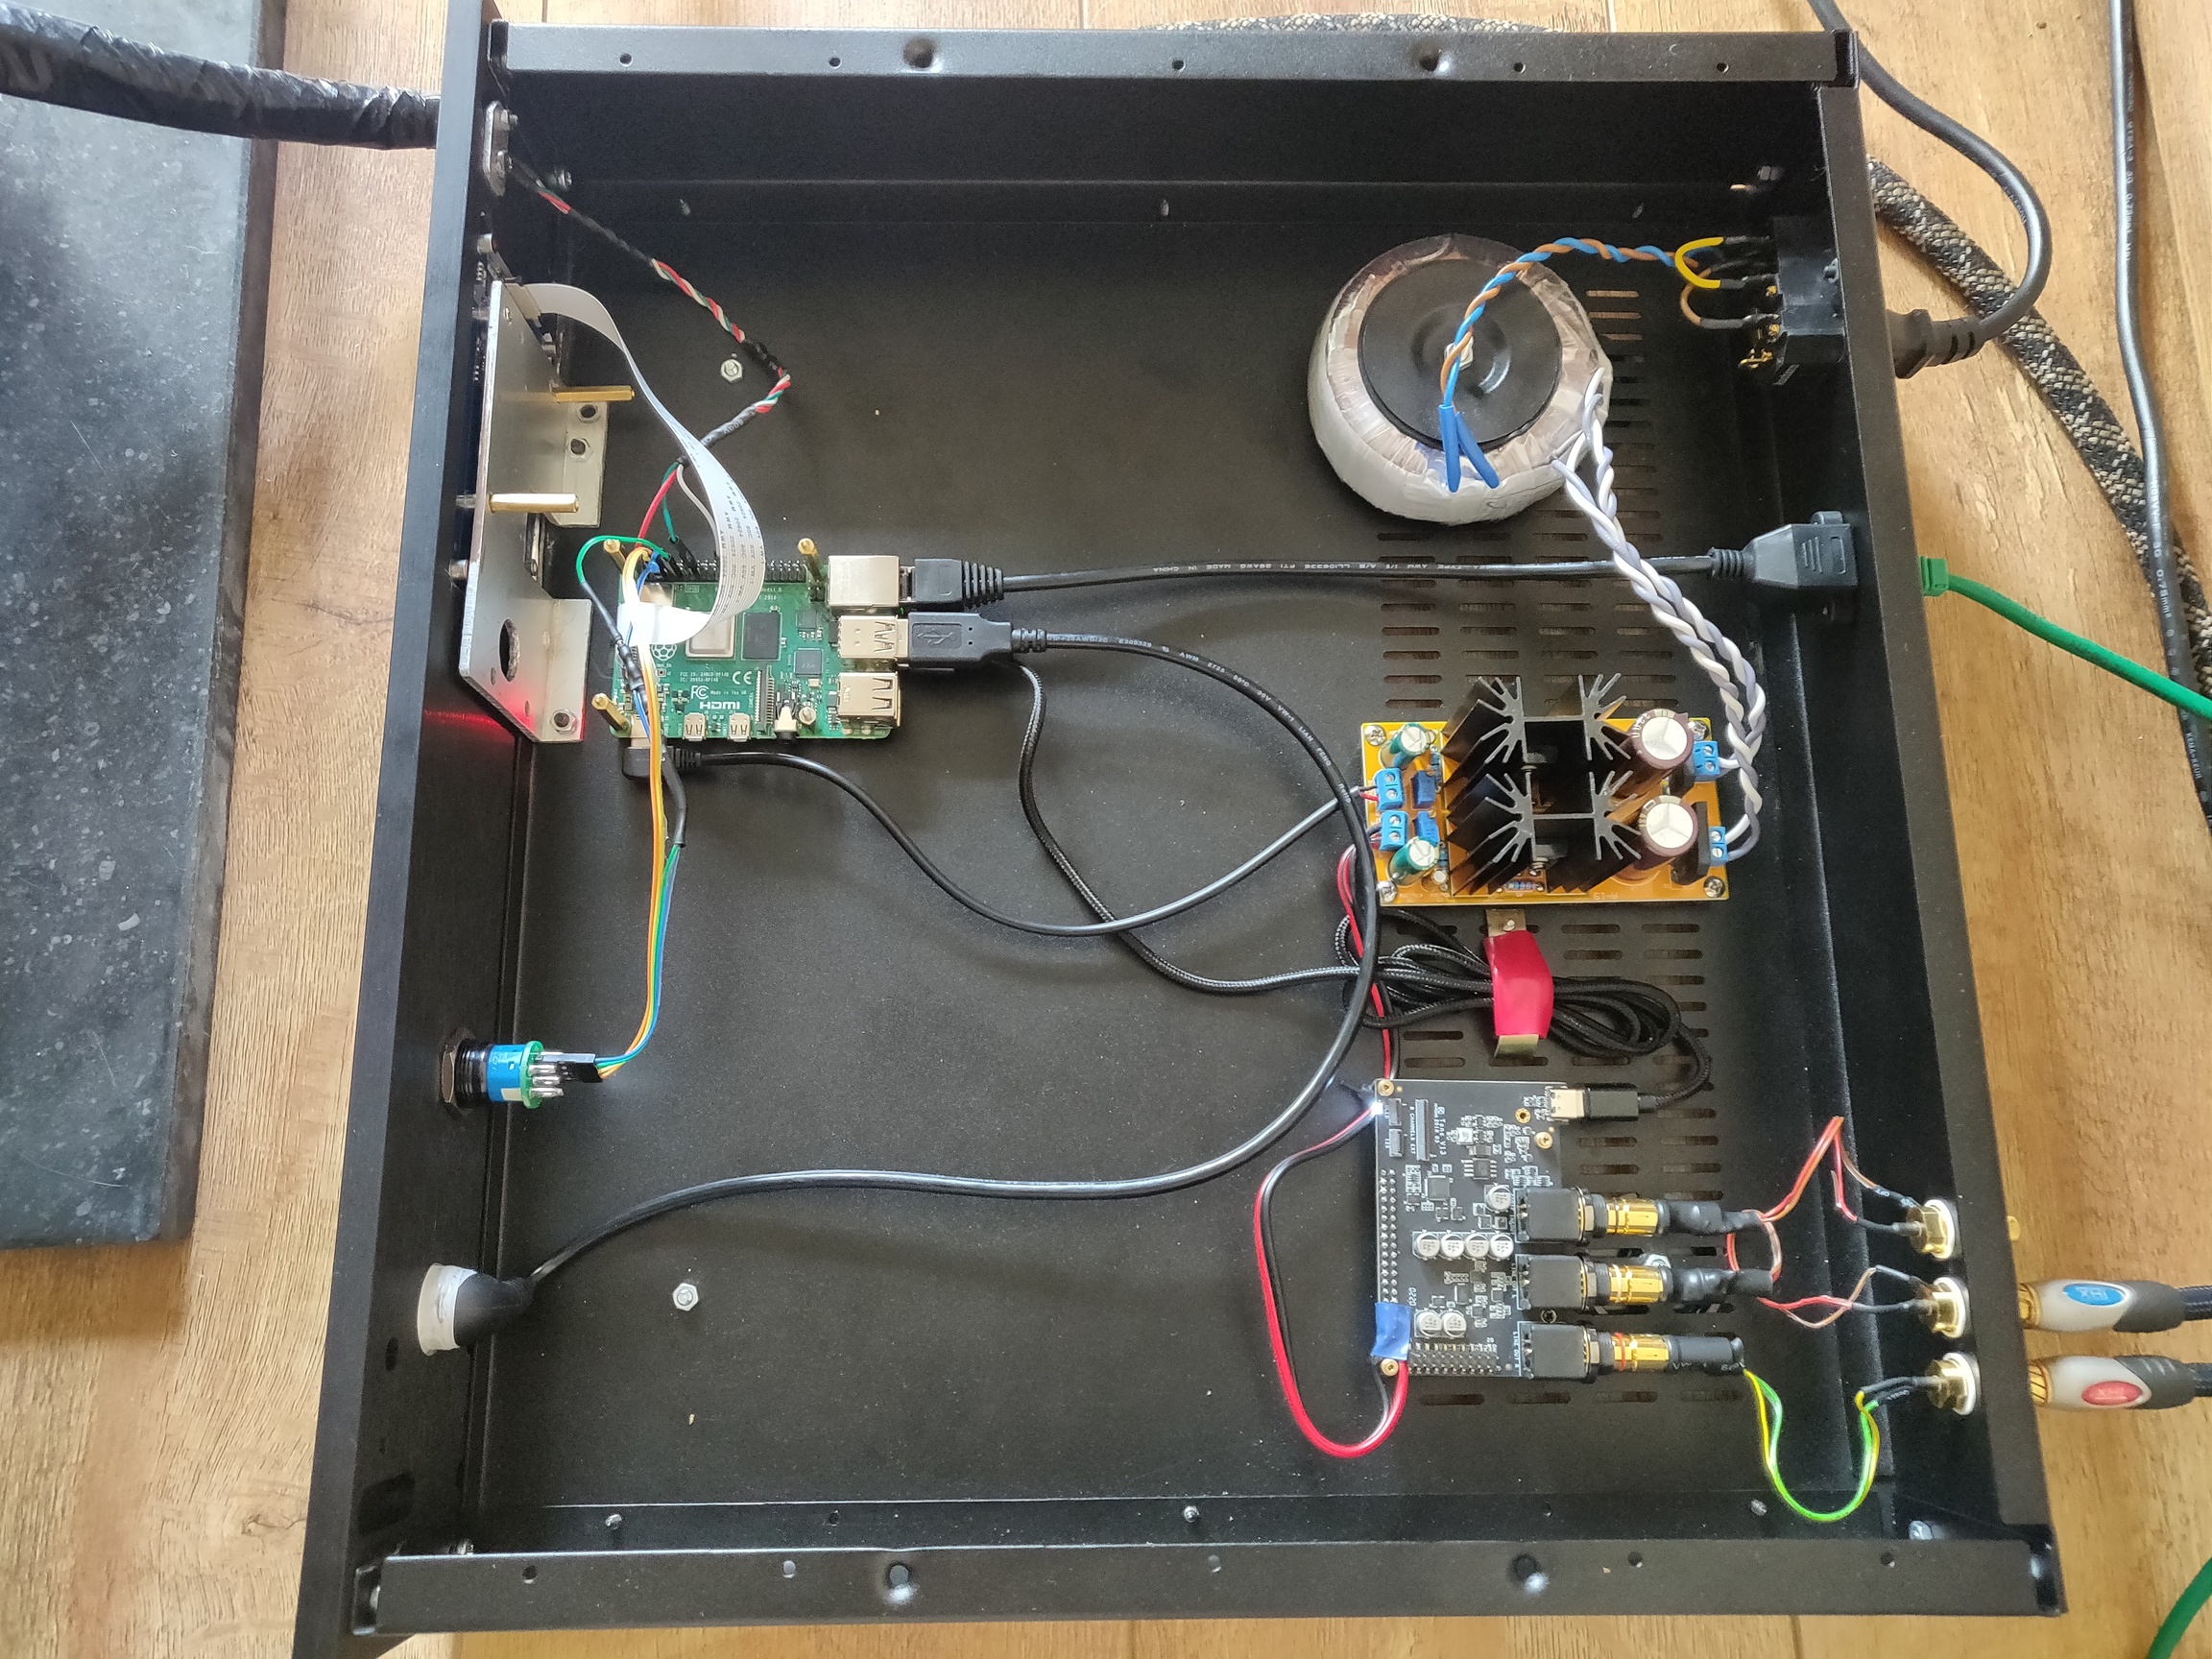
the stuff below that I used for this project, most of it was ordered from audiophonics.


1x khadas tone1 as usb dac and spdif input for a cd player, of course other transport can also be used for spdif.

I supplied the khadas separately with 5 volts.

1x raspberry pi 4b 2gb model.

why a pi4? because the usb buses are separate and sound better with a usb dac than a pi 2/3/3+

1x 4.3inch Capacitive Touch Display for Raspberry Pi, DSI Interface, 800×480.
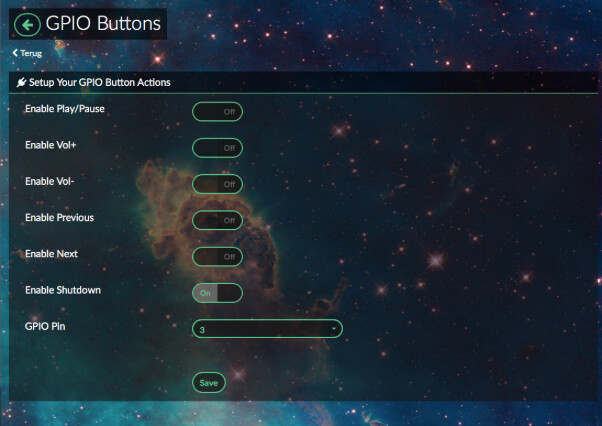
+++display is compatible with the official volumio touchscreen plug-in+++

https://www.waveshare.com/product/displays/lcd-oled/lcd-oled-2/4.3inch-dsi-lcd.htm

1x Ribbon cable official Raspberry Pi 7” LCD Touchscreen Display 20cm.

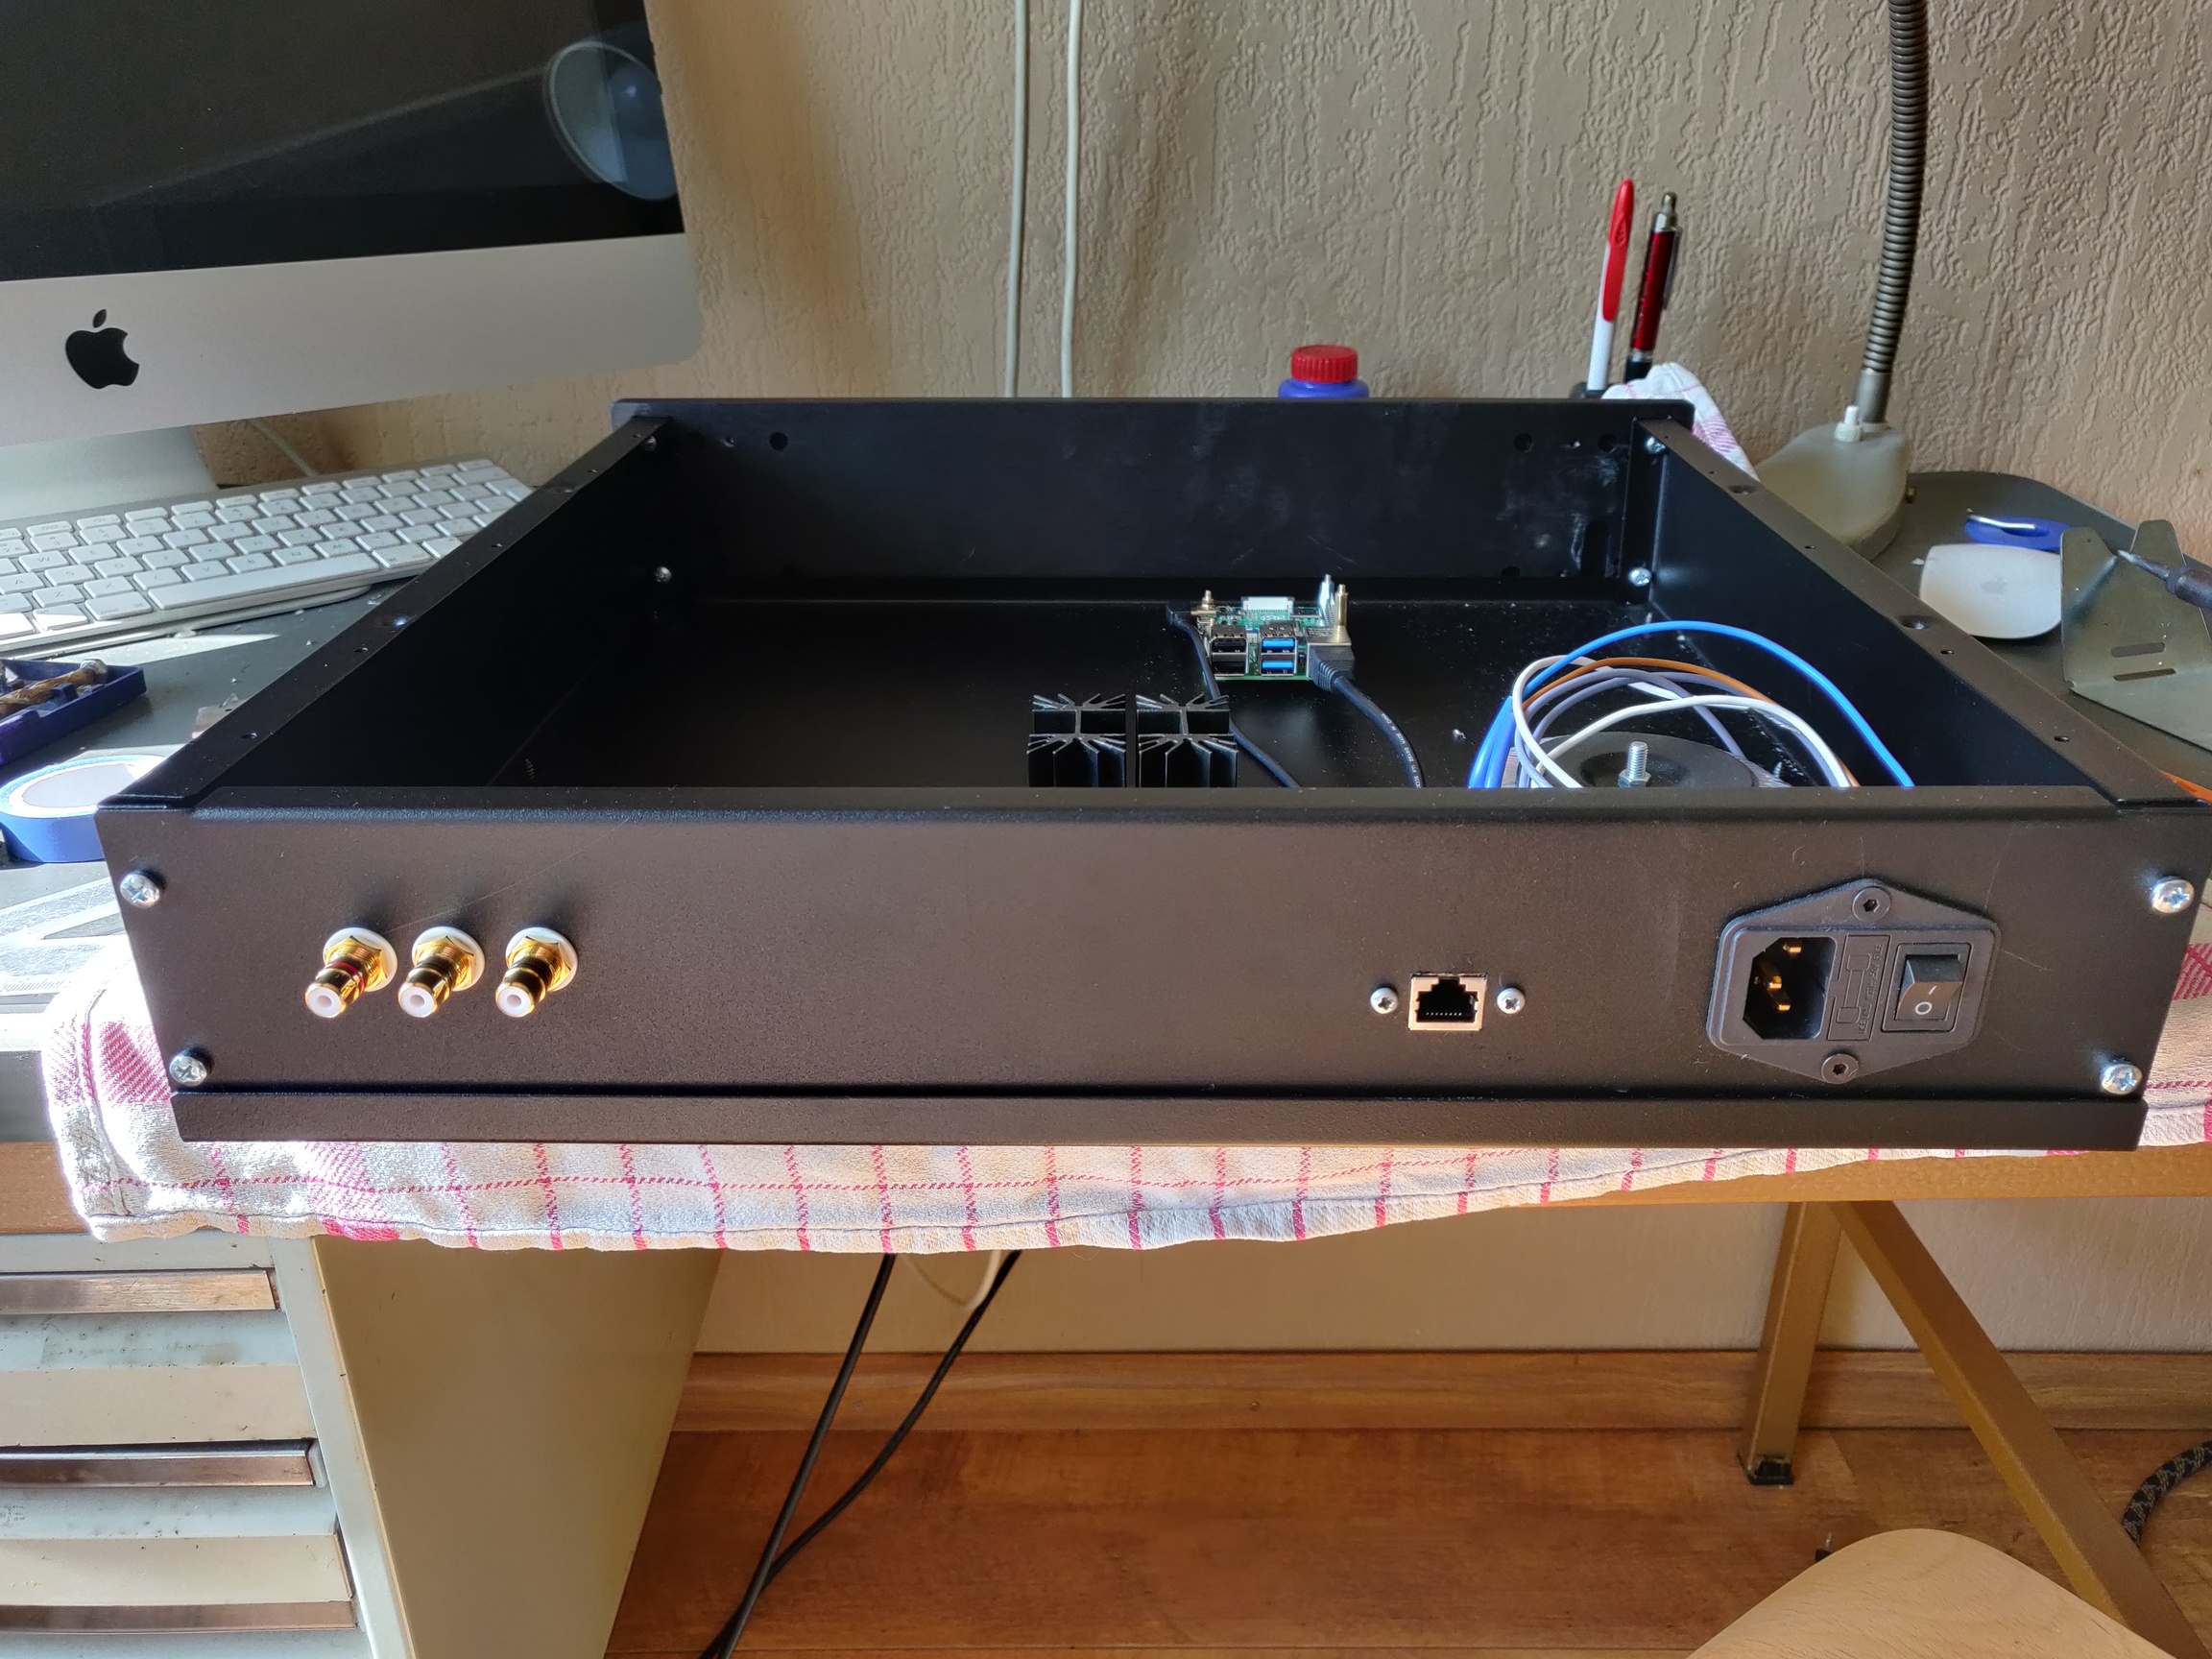
1x hifi 2000 Case 2u 400mm - front 10mm black.

1x Power Module A-19 2x3-20V LT1083.

1x Toroidal Transformer 60VA 2x8V.

1x Aluminium Push Button and Pre-Welded Connector with Blue Light Circle Ø19mm Black.

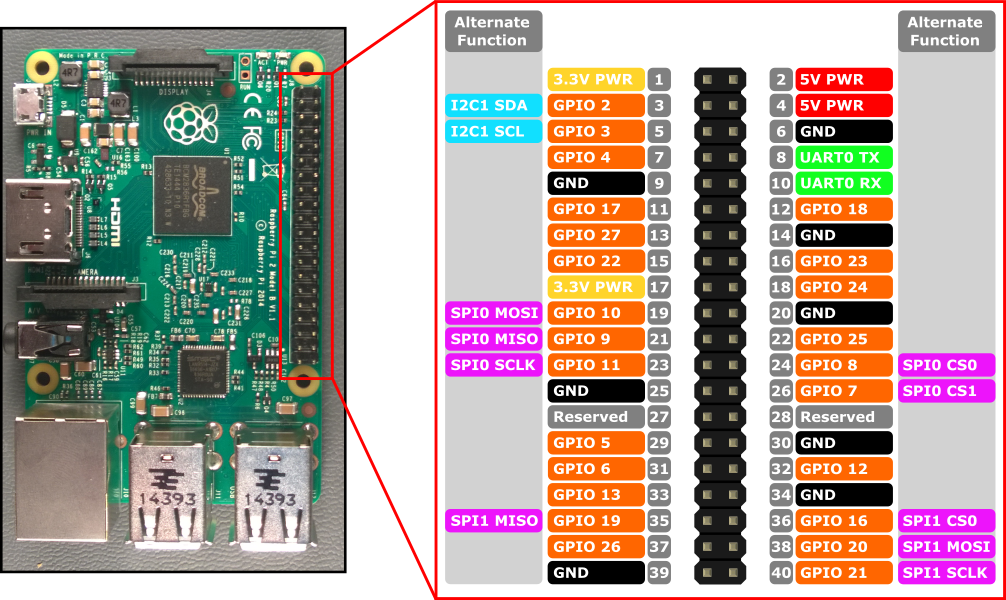
make sure you put a resistor between the led and the gpio pin off the raspberry pi.

1x IEC Gold Plated Copper + Switch + 10A Fuse Holder.

1x Pass Through Panel RJ45 Ethernet (Panel Mount) 33cm.

1x Male 90° Angled USB-C to Bare Wires Power Cable 22AWG 25cm.

1x Panel Mount USB-A 2.0 Male to Angled USB-A 2.0 Female Black 0.5m.

3x WM AUDIO CS-315G RCA Plug Carbon Gold Plated Ø6.5mm.

3x ELECAUDIO ER-101 RCA Headers External Screwing.

1x Infrared IR TSOP32338 receirver 38Khz directivity 45°.

Pack x100 Heat-shrink tubing 2:1 Ø1.5-13mm Black (1m).

Female - Female 2.54 to 2.0mm GPIO Jumper Wires 20cm (x40).

1x INTENSO Memory Card Micro SDHC Class 10 32Gb.

Soldering tin - Lead free soldering 16gr.


8 Likes

Would you happen to remember what size resistor you used between the GPIO and the push button? Looks great! I’d love to build one for myself!

for the led in the push button 260 ohm.

in boot/config.txt
enable_uart=1 status powerled: gpio:14 TXD and ground, 260 ohm resistance to ground.

dtoverlay=disable-bt add this line otherwise the raspberry pi will not start, this does not apply to the pi 2.

start/shutdown button:
gpio:3 and ground.

if everything works fine you can enter the above boot.config.txt lines in /boot/userconfig.txt this way you can update without losing these lines should there be a volumio update.

Schermafbeelding 2021-10-08 om 13.08.00

1 Like

Great! Thanks Michael!

thanks for the awesome information.

Great build! I’m currently trying to implement the same power button with my Pi 4B and Volumio Ver 3.233. I have gotten the LED portion to work as well as the shutdown feature using physical pins 9 and 10. Unfortunately I cannot get the wake feature to work. I am using physical pins 5 and 6 with a momentary switch. As I do not see the GPIO button plugin available I’m at a loss as to how to implement the wake feature. Any ideas? Again, great looking build!
Thanks

1 Like

gpio plugin is not yet implemented in volumio 3.
you can install it manually, check the link.

and the best is to use gpio 3 in the plugin for shutdown and start.

you can also check the volumio-3-plugin-migration-status.

if you want a more elegant power and shutdown way, you can use the audiophonics Power Management, here too the plugin is not yet available in volumio3.

1 Like

Thanks for the reply! I was able to manually install the plugin with no issues. Using GPIO 3 as I use an external DAC. Working perfectly now. :+1:t2:

I like it very much and try to follow.
Is any problem with heating of radiators on power supply?

it gets warm but not so hot that there is a problem with it.
In principle you should not use the toroidal transformer higher than the 8 volt ac if you are going to use the 5 volt dc.

Thanks. I have a similar power supply with an 8VAC but the heatsink is very hot, I can put my fingers for couple of seconds.

coincidentally, I’m going to my brother-in-law’s next week and I’ll check if it gets that hot as well.

Thanks

Last week I checked the power supply of my brother-in-law’s streamer and indeed the heatsink is getting quite warm.
the whole is connected to a raspberry pi 4 but the voltage itself remains pretty stable.
the power supply has enough apmere and why it is so hot I don’t know right now.

Thank you. I was afraid so, I did some calculation.
I think your heatsink has to release about 8W as heat, which is high.
Pi4 will have 1A max and Whaveshare 0.75A (max from data sheet).
(8VACx1.414-1.4V-5V)x1.6A=~8W.
This is why is so hot. I have no idea how it will be for long term operation, this is a concern to me.
One solution is to move LT1083 by wires to the case for better release of heat. The case will act as huge heatsink.

your calculations are correct 8 watts is quite a lot. maybe a bigger heatsink or move and fix it to the case.
long term could become a problem with that heat.

I didn’t really pay attention to this with the build.

I will edit the beginning of the post that it is better not to use this power supply in this combination.

1 Like

I was looking to this power supply: Linear Power Supply board DC LT1083 2.5V to 30V / 6A - Audiophonics
It is usefull attaching to the case or bigger heatsink.

Another question came to my mind.
Are you sure that feeding KTB to usbc just with data is fine?
My understanding is if you use usb c it will take both digital and power.
In your case the LPS for KTB may be useless, so that will add 0.5A to power supply.
I will suggest to use pins for d+ and d- from Pi to KTB.

LE see here https://www.khadas.com/post/tone-1-separating-data-power-connections

in general, heat is dissipated faster with a larger heatsink, you could try that and see if it helps.

as for the khadas tone1 to only use the data lines and the plus/minus for the power supply will not work i already tried this once.
somehow the raspberry pi needs voltage via usb otherwise you will get an alsa error in volumio.

in itself it does not matter what according to the documentation the toneboard1 automatically switches to external voltage.

you could try it with a resistor in between, so that pi has enough voltage not to get an error.

see also link.

https://www.khadas.com/post/khadas-tone-board.

Is something contradictory as I see:

Solution 2 (warranty valid):

The second solution would be to “go with the flow”. We know that when the Tone 1 DAC is powered via it’s GPIO, it will only accept USB data-input from the GPIO header. Conversely, when powered via the USB-C port, it will only accept data-input from the USB-C port.

I will do myself a test.