My unsolicited feature wish list!
- Dim or turn off screen after X minutes of no audio playing. (so I can keep it in my room plugged in at night)
- Wake screen when audio starts playing
My unsolicited feature wish list!
Fantastic work AxLED. Im delighted with the way it works. Thanks a ton.
Also just wanted to point out that the volume up key is not working. Expecting a fix soon. 
Thank you very much
at my installation [pi zero w] (also on 2nd SD-Card with clean install) it is working.
@spinkman: you can turn of display by deactivating the plugin, if this works as workaround for your night dim request.
AxLED
@AxLED
My installation is also on a pi zero w with Pirate audio headphone dac. I downloaded and flashed volumio few hours back on a freshly formatted sd card. Answer to the other questions are as follows
button Y is not working (both volume up function in the now playing menu and down function in the other menu are not working). And its only today that I read this thread and got information about this plugin being available in volumio. So didn’t get a chance to try the previous version.
yes i tried deactivating and reactivating the plugin
yes i restarted few times
i will post the boot content shortly
Thank you
Regards
Sid
Have you tried the GPIO Control plugin, works well for me.
Pin 13 On when playing, Off when paused or stopped.
I’m having trouble ‘coming back’ to volumio from airplay. The display and buttons sometimes freeze. Difficult to be certain how to replicate the problem, working on being a bit more helpful.
New build, Pirate audio plugin.
userconfig
### Start of parameters for pirateaudio plugin ###
dtoverlay=hifiberry-dac
gpio=25=op,dh
dtparam=spi=on
### Fix for Button X, Y of pirate audio ###
gpio=16=pu
gpio=20=pu
gpio=13=op,dl
### End of parameters for pirateaudio plugin ###
### Start of parameters for pirateaudio plugin ###
dtoverlay=hifiberry-dac
gpio=25=op,dh
dtparam=spi=on
### Fix for Button X, Y of pirate audio ###
gpio=16=pu
gpio=20=pu
### End of parameters for pirateaudio plugin ###
# Add your custom config.txt options to this file, which will be preserved during updates
config.txt
initramfs volumio.initrd
gpu_mem=32
max_usb_current=1
dtparam=audio=on
audio_pwm_mode=2
dtparam=i2c_arm=on
disable_splash=1
hdmi_force_hotplug=1
dtparam=spi=on
include userconfig.txt

#### Volumio i2s setting below: do not alter ####
dtoverlay=hifiberry-dac
looks like the update added to the bottom of the userconfig. might need to clean that up. i’m not sure what GPIO the ‘Y’ button uses. will have to troubleshoot after work 
thanks all!
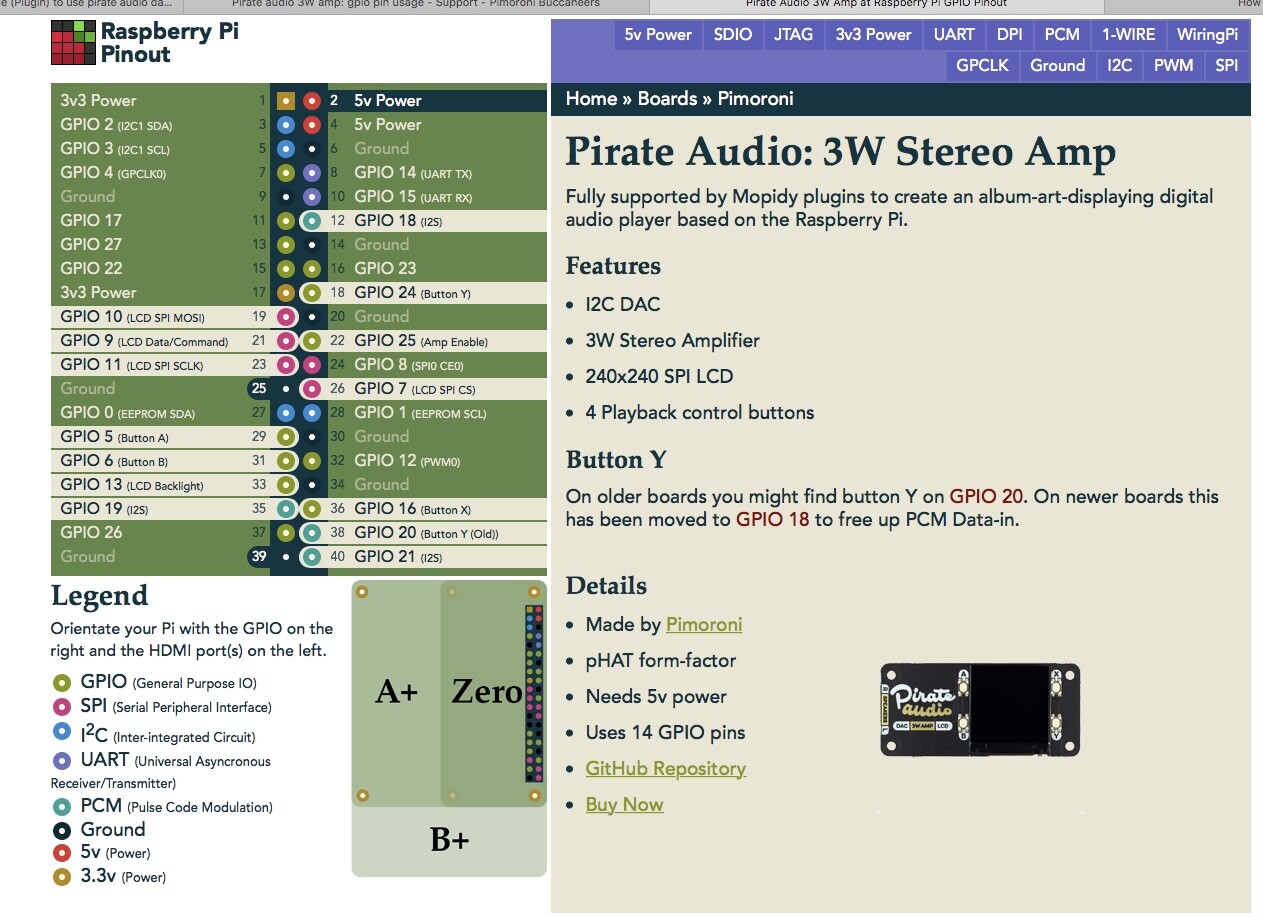
I did find this pinout site that mentions
On older boards you might find button Y on GPIO 20. On newer boards this has been moved to GPIO 18 to free up PCM Data-in.
no mention of GPIO 18 in the userconfig.txt
I tried updating userconfig.txt
gpio=18=pu
that didn’t work
then I found GitHub - pimoroni/pirate-audio: Examples and documentation for the Pirate Audio range of Raspberry Pi add-ons that mentions the Y button is on GPIO 24 and that broke things more…
putting it all back… going back to work hehehe
@spinkmantest_gpio.zip (1,0 KB)
@sidrakes
lets start debugging.
Attached you will find the file test_gpio.py
sudo chmod +x test_gpio.py (in the folder where test_gpio.py is located)python test_gpio.py
If not all 4 buttons are working, try to change line 20 of test_gpio.py with a different GPIO number for the button which didnt work.
If you can tell me the gpio your hat uses, i try to guide you to a solution.
@spinkman
@sidrakes
about the output of your /boot/userconfig.txt. The values shouldn’t be twice.
The right values/content should be:
### Start of parameters for pirateaudio plugin ###
dtoverlay=hifiberry-dac
gpio=25=op,dh
dtparam=spi=on
### Fix for Button X, Y of pirate audio ###
gpio=16=pu
gpio=20=pu
gpio=13=op,dl
### End of parameters for pirateaudio plugin ###
Explanation:
AxLED
volumio@ohc-speaker:~$ python test_gpio.py
buttons.py - Detect which button has been pressed
This example should demonstrate how to:
1. set up RPi.GPIO to read buttons,
2. determine which button has been pressed
Press Ctrl+C to exit!

Button press detected on pin: 6 label: B
Button press detected on pin: 5 label: A
Button press detected on pin: 16 label: X
initalisiere Shutdown
The Y button didn’t detect/show anything, no matter what order. I even reboot and tried again.
The button does work. I confirmed using the Mopidy build I had before and I tested it with another SD card.
I replaced my userconfig.txt with yours, rebooted, re-enabled the pirateaudio plugin. no dice. Y still doesn’t work. Eagerly looking forward to a solution! and perhaps I might fiddle with putting the back light on a timer or a timeout… but one thing at a time.
so your button Y is not working (so far), and it isn’t pin 20 (and not 5,6,16)
Your hat: pirate audio amp 3W
Please try the following:
BUTTONS = [5, 6, 16, 20] to BUTTONS = [5, 6, 16, 18]
gpio=20=pu to gpio=18=pu
python test_gpio.py in commandlineAxLED
My hat: Pirate Audio 3w
Changed button 20 to 18.
output
volumio@ohc-speaker:~$ python test_gpio.py
buttons.py - Detect which button has been pressed
This example should demonstrate how to:
1. set up RPi.GPIO to read buttons,
2. determine which button has been pressed
Press Ctrl+C to exit!

Button press detected on pin: 5 label: A
Button press detected on pin: 6 label: B
Button press detected on pin: 16 label: X
initalisiere Shutdown
Button press detected on pin: 6 label: B
Button press detected on pin: 6 label: B
Button press detected on pin: 16 label: X
initalisiere Shutdown
Button press detected on pin: 5 label: A
The difference this time is that after the X button is pressed, I’m able to continue to press other buttons. still no Y button tho…
Oh!
success!!
Changed button 18/20 to 24
Button press detected on pin: 5 label: A
Button press detected on pin: 6 label: B
Button press detected on pin: 16 label: X
initalisiere Shutdown
Button press detected on pin: 24 label: Y
Button press detected on pin: 24 label: Y
so, it is back to the link I posted that mentions the Y button is on GPIO 24 but I didn’t understand how to assign the button… I’ll play around some more.
thanks for your response, so your Y button is 24.
Your hat: pirate audio amp 3W
Please try the following:
/data/plugins/miscellanea/pirateaudio
BUTTONS = [5, 6, 16, 20] to BUTTONS = [5, 6, 16, 24]
if pin == 20: to if pin == 24:
gpio=20=pu to gpio=24=pu
AxLED
100% success!
change line 80 in display.py from BUTTONS = [5, 6, 16, 20] to BUTTONS = [5, 6, 16, 24]
change line 436 in display.py from if pin == 20: to if pin == 24:
change line 458 in display.py from for x in [5, 6, 16, 20]: to for x in [5, 6, 16, 24]:
I had already changed line 80 in testing but didn’t venture that far down in display.py
Thank you @AxLED for your support. much appreciated.
In my attempts to free up some GPIO pins by wiring the Pimoroni to the pi rather than plugging it into the pi socket I used this diagram from the web (although I can’t remember where I found it)
However, after much fiddling, I found that my board also needs pin 17 (3.3v) to work. Hope this saves someone some time!
Hey @AxLED thanks for your great work. Does your plugin also works with the pirateaudio headphone Amp?
yes the plugin should work on pirate audio headphone amp as well.
According to https://pinout.xyz/pinout/pirate_audio_headphone_amp# there are two versions, which use different GPIO for Y Button. So the worst thing could happen, that Y Button is not working (so far).
But here are the good news, i am working on a update for the plugin, where you can choose the GPIO Pin for Y Button via volumio GUI.
AxLED
Hey @AxLED,
thanks for the fast reply. I set up a new volumio with the pirate headphone dac and installed your plugin. Works great!  Thanks for your work
Only problem I have found, is that Button Y isn’t working as you mentioned. I have tested the GPIOs with your test_gpio.py and it seems that my hat also uses gpio 24, like the one from @spinkman.
Unfortunately the steps you mention above:
/data/plugins/miscellanea/pirateaudio
BUTTONS = [5, 6, 16, 20] to BUTTONS = [5, 6, 16, 24]
if pin == 20: to if pin == 24:
gpio=20=pu to gpio=24=pu
doesn’t work for me. I have double checked the lines, but Button Y still doesn’t work after a reboot. Have you any suggestions how i can fix the problem?