Working on adding a IR Receiver to the Pi 4 i tried looking it up online how to do so and what configuration to look for.
IR receiver I have
red wire for 3v3 power
black wire for Ground
white wire for S out
After connecting the three wires to the IR receiver sensor i then connect them to the Pi 4.
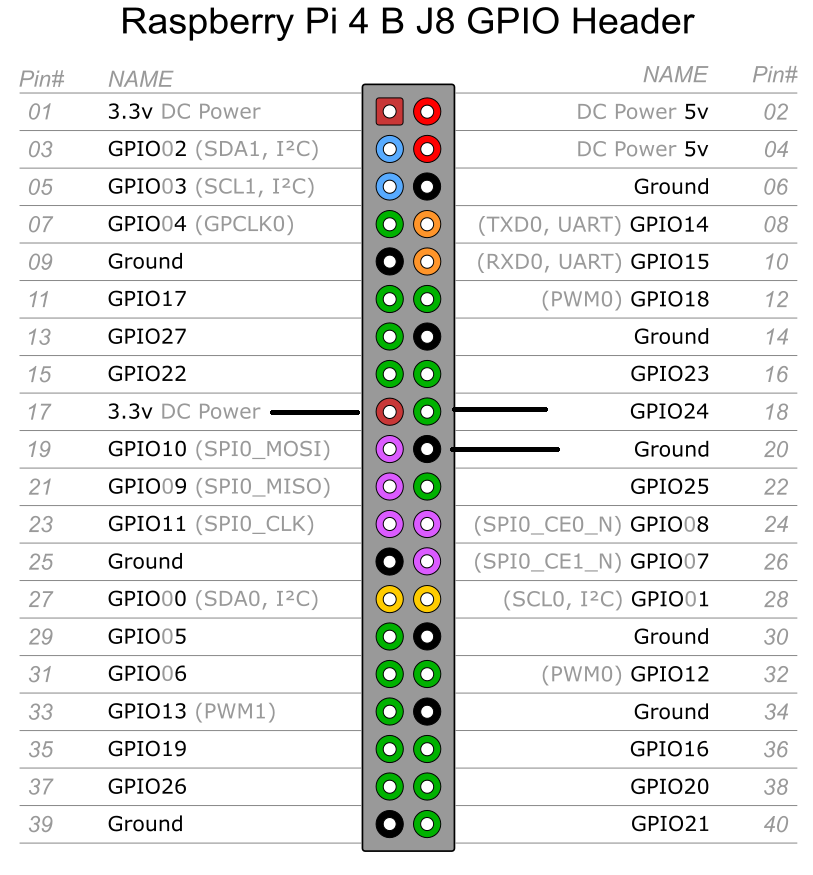
1 Red wire to 3v3 Pin 1
2 Black wire to Ground pin 5
3 White wire to GPIO18 pin 6
I looked up how to config the IR receiver to the pi but when i do, it says edit it for example ( **.**Edit /etc/lirc/hardware.conf and have it appear exactly as shown below.
1
2
3
4
5
6
7
8
9
10
11
12
13
14
15
16
17
18
19
20
21
22
23 # /etc/lirc/hardware.conf
#
# Arguments which will be used when launching lircd
LIRCD_ARGS="--uinput"
# Don't start lircmd even if there seems to be a good config file
# START_LIRCMD=false
# Don't start irexec, even if a good config file seems to exist.
# START_IREXEC=false
# Try to load appropriate kernel modules
LOAD_MODULES=true
# Run "lircd --driver=help" for a list of supported drivers.
DRIVER="default"
# usually /dev/lirc0 is the correct setting for systems using udev
DEVICE="/dev/lirc0"
MODULES="lirc_rpi"
# Default configuration files for your hardware if any
LIRCD_CONF=""
LIRCMD_CONF=""
and it shows that i would likely raise an error.
So do anyone have the right steps already edited and work.
You don’t need to do any of that. IR support is built into the user interface and will set up lirc for you.
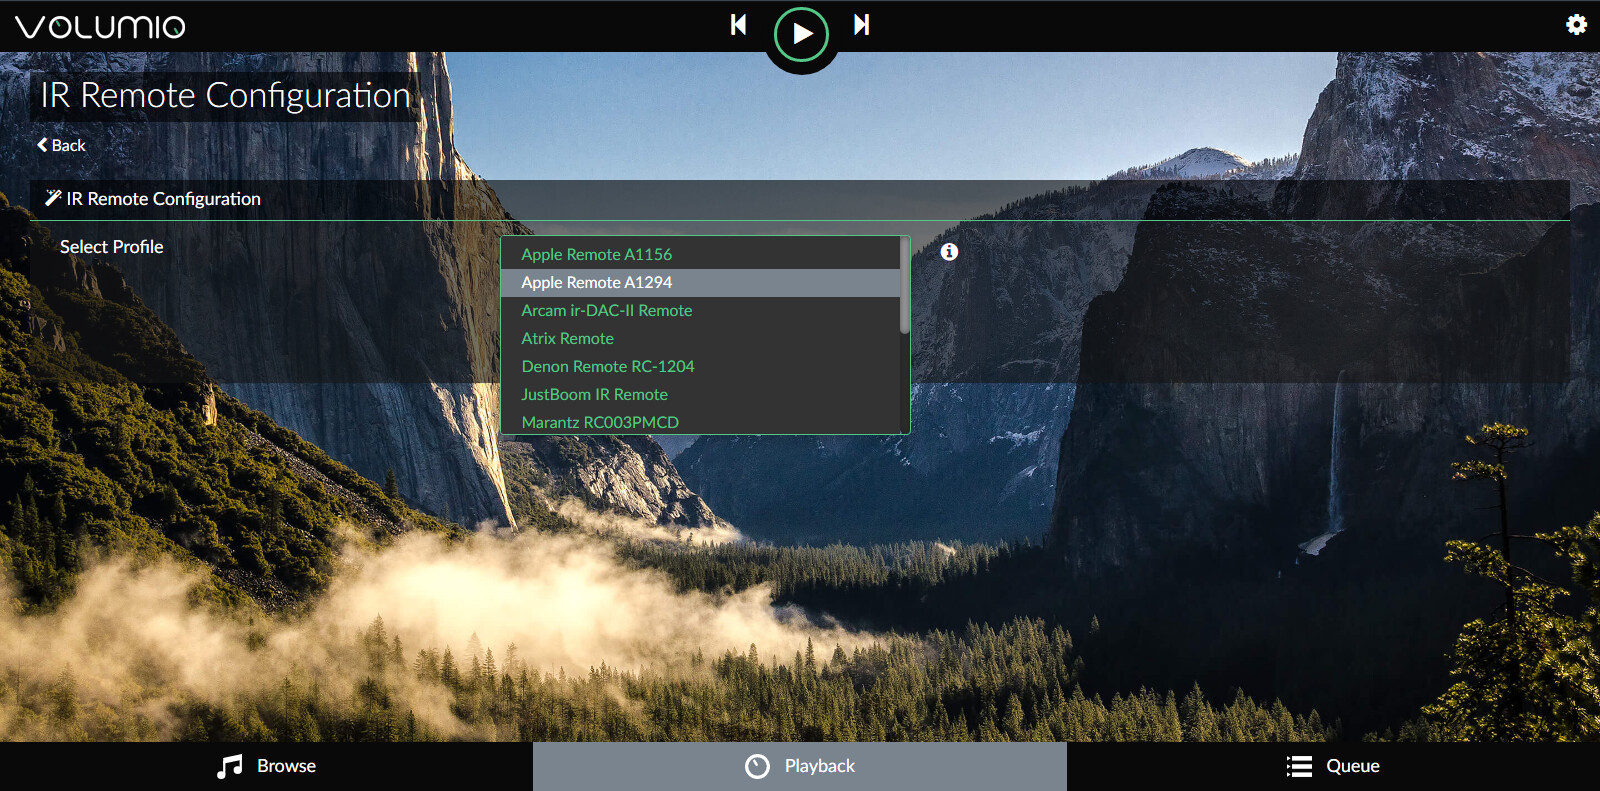
Go to Settings, Plugins, install the IR remote controller plugin.
Choose your remote control type (I use Xbox 360) then save.
Depending on your GPIO pin configuration you may need to override the pin configuration.
To do this create/edit a file /boot/userconfig.txt from ssh.
Here is mine:
# Add your custom config.txt options to this file, which will be preserved during updates
dtoverlay=gpio-ir,gpio_pin=18
Then reboot. Keep in mind this is GPIO numbering not physical pin number.
If your remote control does not already have a profile you can install a custom lirc profile however be aware that Volumio updates will overwrite your lirc profile and you will need to copy it into place again.
I have two Raspberry Pi 4s.
The first Pi 4 has Kodi and Retropie on it connected to the tv.
The second Raspberry Pi 4 has my Volumio player on it, i got the Hifi pro sound card install on the Pi 4 to make the audio sound better.
So what i’m here for is to find the right Lirc steps to install my k-022 Vs1883B Ir Receivers to both Pis to use with a remote. SO, what is the steps to install lirc and get IR receiver going…
My problem here is, I try to find steps, on how to install the IR Receiver with lirc. but when i find the page having the steps on them. I read the configures of the steps but when it start talking about editing this and that, that confuses me something like this https://www.instructables.com/Setup-IR-Remote-Control-Using-LIRC-for-the-Raspber/
1 red wire for power/
2 black wire for ground/
3 white wire for S-out/
Red power wire to the 3v3 pin 1
black wire to the pin 9
white wire from the S-out on the IR receiver to GPIO but which one of the GPIO that the S-out be connected to.
I also here (Note that the IR sensor chip needs to be operated at 3.3V not 5V when used with the Raspberry Pi.
SO do i need to connect the power from the IR receiver to the 3v3 or 5v on the raspberry pi gpio
testing remote press any key

On these two lines
(lirc_rpi gpio_in_pin=18 gpio_out_pin=17
wget http”//osoyoo.com/driver/pi 3_start_learning_kit_lesson_19/lircd.conf

would i have to change the # 18 17 to the pin 1 for the 3.3v and pin 9 for the ground and 18 for the s out to the GPIO18 that i have the wires connected to

But as for the configuration above are they right or how would edit the commands.
I don’t understand why you’re installing all these kernel modules etc… this is all unnecessary and only likely to cause you problems, and to be honest I can’t help you if you’ve now got your system into an unknown state.
As I explained support for Lirc is already built into Volumio and is activated by installing the IR remote controller plugin - this sets up nearly everything for you including kernel drivers etc.
The only things you need to do beyond that is configure your GPIO pin config in /boot/userconfig.txt and if your remote is not supported by the built in lircd profiles which you can select in the plugin UI, you will need to install a custom lircd.conf for it.
Custom lircd profiles can be installed in /data/plugins/accessory/ir_controller/configurations
Create a directory of the name of your remote then in the directory create/copy a lircd.conf for the remote and create a lircrc.
Have a look in one of the others like the XBox 360 one to see how this is done. The lircd.conf is the lirc profile for the remote while lircrc maps which key codes execute which functions in Volumio so in most cases you can just copy the lircrc from one of the other remote profiles and modify it slightly.
Once this directory with the two files is in place you will find a new option you can select within the plugin to activate it.
Unfortunately Volumio updates will delete your custom directory but a workaround might be to keep a copy elsewhere and automatically copy it back on bootup.
I’m not sure if there is an “official” way to install custom profiles that are not overwritten during upgrades. Perhaps if the plugin author sees this thread they can comment.
I really would like to program a remote to the Raspberry Pi 4 that would control the player and also turns off the Pi itself, which i figure i get power on/off the Pi by other remote and have one remote just for the player.
Back to the apple remote for now, like i said, i tried both apple remote plugins but i couldn’t get anything working on them
it uses python and a tutorial of it …
i didn’t see one 4 the pi4 yet… all are based on pi3 or lower but this should be self learning,
if you press you get the code of any remote and if you link that to your commands you should be done
there are full kits on ali for the pi3 don’t know if it will work on pi 4
if you look it on youtube you can get the software if the works with volumio i don’t know…
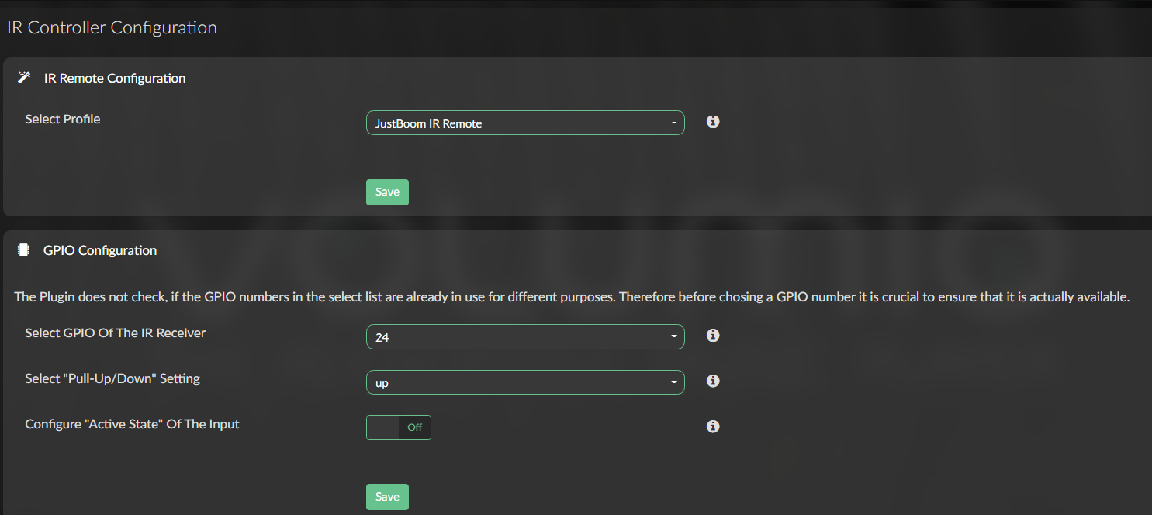
I set the GPIO pin to gpio24
I have some IR sensor
ground
middle pin Volt
s pin signal out.
So i connect all three jumper wire and connected them to 3.3v pin/ ground pin/ gpio24 pi that is mart in the snapshot
So, today, a booted up the player and grabbed the JustBoom remote which i have selected on Volumio and i tried but nothing happed when hitting the buttons on the remote
Well the plugin for Justboom remote, once i got that going finally, most of the buttons didn’t work, so Now i’m looking on in lirc so i can use any remote, infect i got one.

")
")